
Advice
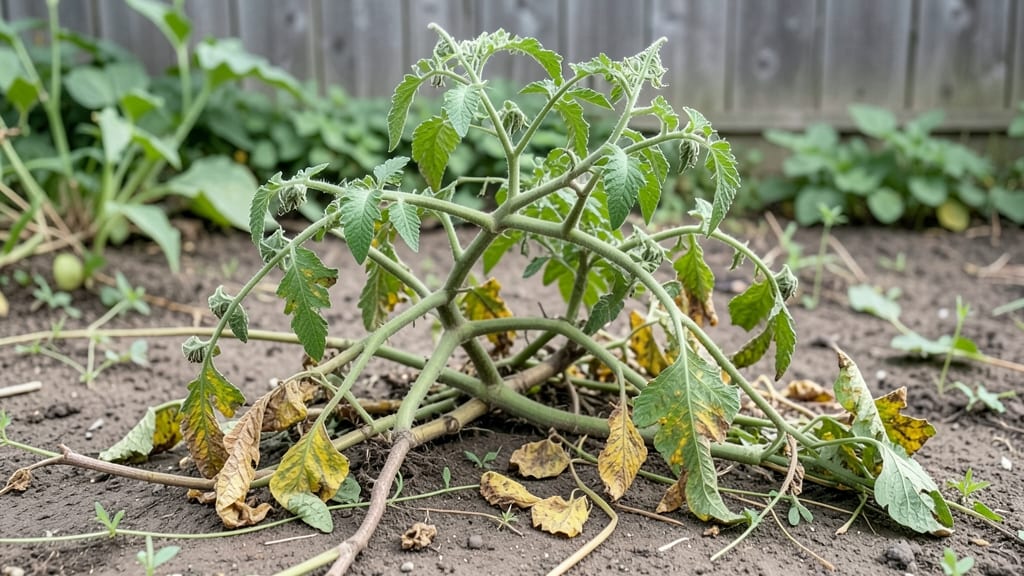
My first gardening season nearly ended in disaster because of these five bad gardening habits that even experienced gardeners fall for. 🌱 I’ve since learned how to spot them early—before they turn your thriving plants into sad, wilted memories.
The good news? Fixing them is simpler than you think, and your garden will thank you with stronger growth and fewer headaches.
Overwatering tops the list, drowning roots and inviting rot. Then there’s skipping soil tests, which leaves nutrients unbalanced and plants struggling to thrive. Ignoring pests until they’ve taken over is another classic—those tiny invaders multiply fast.
Poor mulching techniques waste water and invite weeds, while planting too close together stunts growth by stealing sunlight and nutrients.
With just a few adjustments, you’ll see healthier plants in weeks. Start by checking soil moisture with your finger instead of guessing, and learn to read plant leaves for signs of stress.
A little prevention goes a long way—think of it as gardening insurance. Your future self (and your plants) will appreciate the effort.
These mistakes are fixable, and every season is a chance to improve. The key is paying attention to details most gardeners overlook. Whether you’re a beginner or a seasoned pro, there’s always room to grow—both your plants and your skills. Let’s turn those mistakes into wins before next planting season.
📚 In This Guide
- What you need
- Instructions
- Tips and common mistakes
- Wrapping up and next steps
What you need
- ● Hand trowel – A sturdy, medium-sized trowel (6–8 inches) for digging, transplanting, and soil checks.
- ● Pruning shears – Sharp, bypass-pruning shears (for clean cuts on stems, branches, or dead foliage).
- ● Garden gloves – Durable, breathable gloves (e.g., nitrile-coated for grip and protection).
- ● pH testing kit – Digital or liquid test kit to measure soil acidity/alkalinity (ideal range: 6.0–7.0 for most plants).
- ○ Moisture meter – A soil moisture probe to check hydration levels (optional but helpful for over/under-watering fixes).
- ● Notebook & pen – To track plant progress, watering schedules, and observations.
- ● Spray bottle with water – For misting seedlings or inspecting leaves up close.
- ● Fungicide (neem oil or copper-based) – For treating fungal diseases (e.g., powdery mildew, black spot).
- ● Insecticidal soap or horticultural oil – To combat pests like aphids, spider mites, or whiteflies.
- ● Compost or organic fertilizer – Balanced 10-10-10 or slow-release granules (e.g., worm castings for nutrient-poor soil).
- ● Mulch (straw, shredded bark, or pine needles) – 2–3 inches thick to retain moisture and regulate temperature.
- ● Drip irrigation kit or watering can with rose attachment – For precise, even watering (avoid overhead sprinklers).
- ● Sunlight assessment – Note your garden’s light exposure (full sun, partial shade, etc.) for 6+ hours/day.
- ● Plant research – Know your plants’ specific needs (e.g., water, soil type, spacing).
- ● Weather check – Avoid working in extreme heat or cold; early morning or late afternoon is best.
- ● Time commitment – Dedicate 15–30 minutes daily for inspections and maintenance.
How to avoid the 5 most common plant-killing gardening mistakes
Even experienced gardeners fall into these traps—here's how to spot and fix them before your plants suffer.
💧 Step 1: Stop Overwatering and Drowning Your Roots
I see it all the time: plants wilting not from thirst, but from too much water. Most houseplants and garden beds only need water when the top 1-2 inches of soil feel dry. Stick your finger in—if it's damp, wait. Overwatering suffocates roots by cutting off oxygen, leading to root rot and yellowing leaves.
Here's the thing—most containers lack proper drainage. If your pots have no holes, drill them yourself. I always check for soggy soil by lifting the pot—if it's heavy with water, you've overdone it. Let the soil dry between waterings, especially in winter when growth slows dramatically.
☀️ Step 2: Don't Ignore Light Requirements (Yes, Even North Windows Count)
Plants don't just need "some light"—they need the right kind. A north-facing window might seem bright, but it's often too diffuse for sun-loving plants like tomatoes or peppers. These need 6+ hours of direct sunlight, while others thrive in bright indirect light.
I know it seems counterintuitive, but leggy, stretching plants mean your light is too weak. Rotate pots weekly so all sides get even exposure. If your plants are reaching toward the window, move them closer or supplement with a grow light. You'll see stronger stems and darker green leaves within days of proper lighting.
✂️ Step 3: Prune at the Wrong Time or Too Aggressively
Pruning isn't just about cutting back—it's about timing and technique. Cutting back too late in the season removes next year's growth, while pruning at the wrong time can shock plants. For most perennials, prune right after flowering or in early spring before new growth starts.
Real talk: I've killed more plants by over-pruning than by any other mistake. Never remove more than 1/3 of the plant's foliage at once. Use clean, sharp shears to avoid tearing stems, and always cut just above a leaf node or bud. You'll encourage bushier growth and prevent disease entry points.
🌱 Step 4: Planting Too Deep or Burying Stems
Burying stems too deep suffocates plants and causes them to rot. The general rule is to plant so the top of the root ball sits at soil level. For seeds, plant at a depth of about twice the seed's diameter—any deeper and they'll struggle to emerge.
I've seen gardeners bury tomato plants up to their first leaves, thinking it gives them stability. Instead, it traps moisture against the stem and invites disease. After planting, gently firm the soil around the base but leave the stem exposed. You'll see healthier, more vigorous growth when roots aren't fighting to breathe.
🪴 Step 5: Using the Wrong Soil or Not Amending Properly
Garden soil isn't always the best soil. Heavy clay or sandy soil drains too slowly or too quickly, both of which stress plants. Amend your existing soil with 2-3 inches of compost before planting to improve texture and fertility. For containers, always use fresh potting mix—not garden soil—which compacts and blocks roots.
Don't skip the soil test either. I've had clients swear their "good dirt" was perfect, only to discover it was missing essential nutrients. Adjust pH as needed—most vegetables prefer 6.0-7.0, while blueberries need 4.5-5.5. Your plants will reward proper soil with stronger stems, better leaf color, and more abundant blooms or harvests.
Tips & tricks for healthy plant growth
Even the most experienced gardeners need a little extra guidance to keep their plants thriving. Here's how to avoid the most common pitfalls that can turn your green thumb into a black thumb.
Soil Moisture Test: Instead of relying on a watering schedule, I learned the hard way that sticking your finger into the soil is the most reliable method. The top 1-2 inches should feel dry before watering again—this prevents overwatering, which is the #1 cause of root rot. For container plants, lift the pot: if it feels heavy, you've likely overwatered. In winter, cut back watering by half since growth slows dramatically. Remember, soggy soil equals suffocated roots.
Light Positioning Strategy: That north-facing window might seem perfect, but it's often too dim for sun-loving plants like tomatoes and peppers, which need 6+ hours of direct sunlight. I've seen too many gardeners give up on plants that were simply placed in the wrong light. Rotate your pots weekly so all sides get even exposure—this prevents leggy growth and ensures even development. If your plants are stretching toward the light, it's time to move them closer to a brighter spot or invest in a grow light.
Pruning Precision: Confession: I skipped this step for years and wondered why my plants never looked their best. The golden rule is to never remove more than 1/3 of the plant's foliage at once. For perennials, time your pruning right after flowering or in early spring when new growth begins. Always use clean, sharp shears and cut just above a leaf node or bud to encourage bushier growth. I've found that proper pruning can actually extend a plant's lifespan by reducing stress and preventing disease entry points.
Planting Depth Secret: I've seen gardeners bury tomato stems up to the first leaves, thinking it would give them more stability. Here's the thing: burying stems too deep suffocates them by trapping moisture against the stem, which invites rot. The top of the root ball should always sit at soil level. For seeds, plant at a depth of about twice the seed's diameter—any deeper and they'll struggle to emerge. This simple adjustment makes a world of difference in plant vigor.
Pro Tips for Bad Gardening Habits
- Even the most experienced gardeners need a little extra guidance to keep their plants thriving.
- Soil Moisture Test: Instead of relying on a watering schedule, I learned the hard way that sticking your finger into the soil is the most reliable method.
- Light Positioning Strategy: That north-facing window might seem perfect, but it's often too dim for sun-loving plants like tomatoes and peppers, which need 6+ hours of direct sunlight.
Frequently asked questions
Got questions about those sneaky gardening mistakes?
You’re not alone! Here are some of the most common concerns—and how to fix them before they ruin your green thumb efforts.
Why do my plants wilt even after watering them?
Overwatering or poor drainage are often the culprits. Wilting can also signal root rot or compacted soil. Check the soil moisture by sticking your finger 1–2 inches deep—if it’s soggy, hold off on watering. For container plants, ensure pots have drainage holes and use well-draining soil mixes.
Can I fix over-fertilizing damage?
Yes, but act fast! Flush the soil with water to dilute excess nutrients, then repot the plant if needed. Avoid fertilizing for 4–6 weeks to let roots recover. For severe cases, trim damaged foliage and use a diluted, balanced fertilizer sparingly. Pro tip: Always follow package instructions—more isn’t better!
How do I know if my plants are getting too much sun?
Look for crispy, brown edges on leaves (sunburn) or a pale, stretched appearance (etiolation). Move plants to partial shade or use shade cloth (30–50%) if they’re struggling. Observe their natural habitat—most tropical plants thrive under dappled light, while succulents crave full sun.
Is it okay to reuse old potting soil?
Not ideal! Old soil loses nutrients, compacts, and may harbor pests or diseases. Refresh it by mixing in 25–50% new potting mix or compost. Sterilize soil by baking it at 200°F (93°C) for 30 minutes if repurposing. Pro tip: Add perlite or vermiculite to improve aeration in reused soil.
Why do my plants attract so many pests?
Weak plants (from overcrowding, poor nutrition, or stress) are pest magnets. Start with healthy soil, space plants properly, and inspect new additions for hitchhiking bugs. Neem oil or insecticidal soap can treat mild infestations. Prevention tip: Encourage beneficial insects like ladybugs with companion plants like marigolds!
Wrapping up and next steps
Breaking bad gardening habits starts with awareness—and now, you’ve got the tools to spot and fix them! 🌱 From overwatering to ignoring soil health, small tweaks can transform your garden into a thriving oasis. Remember, every expert gardener was once a beginner.
Ready to take the next step? Start with one change—like testing your soil or adjusting your watering routine—and watch your plants (and confidence!) grow. Happy gardening! 🌿