Tools
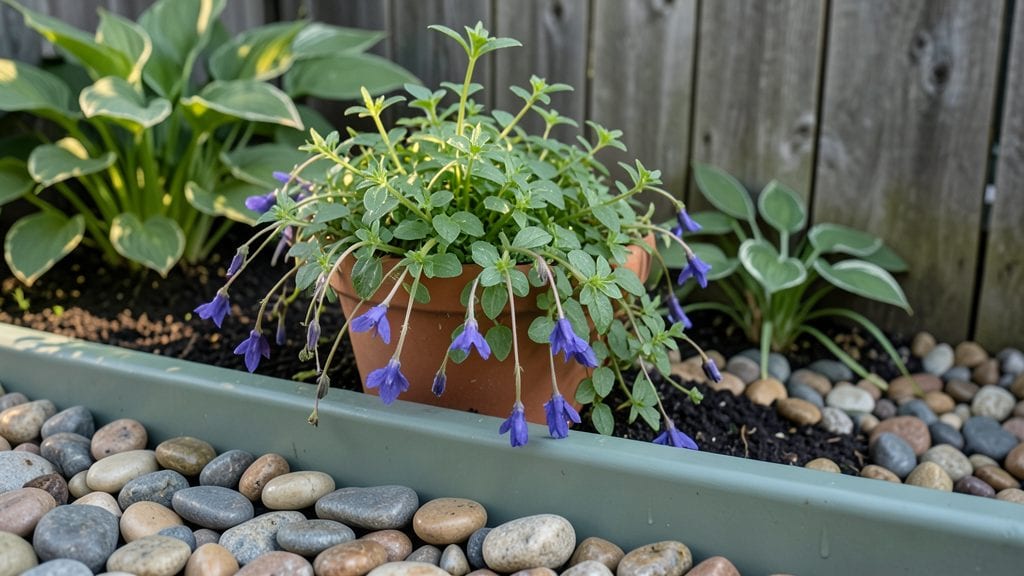
Turning old rain troughs into a vertical garden is one of those projects that makes me smile every time I walk past it. 🌿 I stumbled onto this idea after seeing neighbors tossing rusty troughs—until I realized they could become a lush, space-saving garden for herbs, trailing flowers, or even climbing vines.
The best part? They’re free or cheap, and the vertical space transforms even the smallest patio or balcony into a thriving green wall.
You’ll need just a few basics: the trough itself (cleaned thoroughly), some quality potting mix, and drainage holes if they don’t already exist.
Add a layer of gravel at the bottom to prevent root rot, then fill with soil mixed for your chosen plants—herbs like thyme or oregano love the shallow roots, while succulents thrive in the drier conditions.
A simple watering can with a long spout makes maintenance a breeze, and you can even add a drip irrigation system for hands-off growing.
The results are shockingly lush for such a simple setup. Imagine fresh basil within weeks, or nasturtiums trailing over the edges by summer.
The vertical design also keeps pests at bay since plants grow away from the ground, and you’ll save space that would otherwise go to a traditional garden bed.
Plus, the rustic charm of repurposed metal adds character to any outdoor area—whether you lean into a farmhouse vibe or a modern minimalist look.
Works in full sun or partial shade, depending on your plant choices, and adapts to almost any climate. The key is matching your plants to the trough’s depth and water retention. Once you’ve got one going, you’ll wonder why you didn’t start sooner—it’s that satisfying.
📚 In This Guide
- What you need
- Instructions
- Tips and common mistakes
- Wrapping up and next steps
What you need
- ● Rain Trough: 1 galvanized steel or plastic trough (4–6 ft long, 4–6 inches wide, and 2–4 inches deep). Pro tip: Ensure it has drainage holes or drill them yourself!
- ● Drill & Drill Bits: For creating drainage holes (if needed) and mounting brackets.
- ● Mounting Hardware: 4–6 heavy-duty L-brackets or wall mounts (depending on trough length and weight).
- ● Screws (3–4 inches long) and wall anchors (for masonry or drywall).
- ● Potting Mix: 1–2 bags of lightweight, well-draining soil blend (e.g., 60% coco coir, 30% perlite, 10% compost).
- ● Plants: Climbing plants: 2–4 vines (e.g., nasturtiums, clematis, or ivy).
- ● Herbs: 2–3 compact varieties (e.g., thyme, oregano, or creeping rosemary).
- ● Watering Can or Hose with Nozzle: For gentle hydration.
- ○ Landscape Fabric (Optional but Recommended): To prevent weeds and retain moisture.
- ● Decorative Edging: Paint or stencils to customize your trough.
- ● Drip Irrigation Kit: For hands-off watering (great for busy gardeners!).
- ● Solar-Powered Lights: To highlight your vertical oasis after dark.
- ● Self-Watering Wick System: For low-maintenance moisture control.
Step-by-Step instructions for building a rain trough garden
Here's how to transform a simple rain trough into a thriving vertical garden for herbs and climbers.
🪴 Step 1: Prepare the Trough and Drainage
Start by cleaning your rain trough thoroughly with a 10% bleach solution to kill any existing bacteria or pests. Rinse it completely and let it dry in the sun. If your trough doesn't have drainage holes, drill ¼-inch holes along the bottom using a step bit—space them 6 inches apart to prevent soil from washing out.
Line the bottom with landscape fabric to prevent soil from escaping through the holes. Secure it with a staple gun or heavy rocks. This fabric also helps roots breathe while keeping fine soil particles in place. I always add a 1-inch layer of gravel over the fabric to improve drainage further—water should flow freely without pooling.
🌱 Step 2: Layer Soil and Planting Medium
Fill the trough with 3 inches of lightweight potting mix—this ensures roots get enough air while retaining moisture. I like to mix in 1 part perlite for every 3 parts potting mix to keep things fluffy. Spread the 3 inches evenly across the bottom, then smooth it out with your hands.
For climbing plants like morning glories or sweet peas, add 2 inches of coconut coir on top of the soil. This lightweight material holds moisture while giving vines something to grip. If you're planting herbs like thyme or oregano, skip the coir and add another 1 inch of potting mix instead.
☀️ Step 3: Plant Your Climbers and Herbs
Dig small holes—about 1 inch deep and 1 inch wide—for each plant. Place seedlings or small plants gently into the holes, then cover the roots with soil. Press lightly around the base to secure them without compacting the mix. I space my climbing plants 4 inches apart and herbs 6 inches apart to give them room to grow.
If using seeds, sprinkle them on the soil surface and press lightly so they make contact with the medium. Cover with a ¼-inch layer of vermiculite to hold moisture while seeds germinate. Water gently with a spray bottle—you want the soil to be damp but not soggy. Watch for first true leaves in 7-14 days, depending on the plant.
💧 Step 4: Water and Position for Growth
Water thoroughly after planting, allowing water to run out the drainage holes. Let the trough sit for 10 minutes to drain completely—this prevents root rot. Place your rain trough garden in a spot with at least 6 hours of sunlight daily. South-facing walls or balconies work best for most herbs and climbers.
If your trough is exposed to strong winds, secure it to a wall or fence with sturdy brackets to prevent tipping. I like to use zip ties for lightweight troughs or L-brackets for heavier ones. Check the soil moisture every 2-3 days—water again when the top ½ inch feels dry to the touch.
✂️ Step 5: Maintain and Encourage Growth
Once plants are established, fertilize every 4-6 weeks with a balanced liquid fertilizer (10-10-10 ratio). Dilute it to half-strength to avoid burning tender roots. Climbing plants will need support—install trellises or twine along the sides of the trough as they grow. I use bamboo stakes for herbs to keep them upright.
Prune leggy growth regularly to encourage bushier plants. For herbs, snip leaves from the top to promote new growth. For climbers, pinch back the tips when vines reach 6 inches to encourage branching. Watch for pests like aphids—spray with neem oil if you spot them early to avoid infestations.
Tips & tricks for perfect rain trough gardens
Transforming a rain trough into a lush vertical garden takes just the right balance of prep and patience. Here's how to avoid common pitfalls and create a thriving oasis.
Drainage is Everything: In Step 1, those ¼-inch holes spaced 6 inches apart aren't just for looks—they're critical for preventing waterlogged soil. I've seen troughs fail when owners skipped this step, thinking "it's just a little water." Trust me, roots need to breathe! If you're nervous about drilling, start with just 3 holes and test drainage before committing to the full pattern.
Soil Layering Secrets: The 3-inch base of potting mix in Step 2 is your foundation, but the real magic happens with the perlite mix. I learned the hard way that skipping the perlite leads to compacted soil that suffocates roots. For extra fluffiness, sift your potting mix before adding—this removes clumps that can create air pockets. And if you're using coconut coir, soak it in water for 10 minutes first to prevent it from wicking moisture away from your plants.
Plant Spacing Matters: Those 4-inch spacing for climbers and 6-inch spacing for herbs in Step 3 might seem generous, but they're essential. Crowding leads to competition for nutrients, and your plants will end up leggy and weak. For compact herbs like thyme, you can actually reduce spacing to 4 inches—they're happy in tighter quarters. Just avoid planting herbs and climbers side-by-side; they have different water needs.
Sunlight Strategy: The 6 hours of sunlight mentioned in Step 4 is your minimum, but most herbs and climbers thrive with 8-10 hours. If your location gets less, choose shade-tolerant varieties like mint or ferns. I position my troughs near south-facing windows or walls, but if you're using a north-facing spot, supplement with grow lights for 4-6 hours daily during the plant's growth phase.
Pro Tips for Rain Trough Garden
- Transforming a rain trough into a lush vertical garden takes just the right balance of prep and patience.
- Drainage is Everything: In Step 1, those ¼-inch holes spaced 6 inches apart aren't just for looks—they're critical for preventing waterlogged soil.
- Soil Layering Secrets: The 3-inch base of potting mix in Step 2 is your foundation, but the real magic happens with the perlite mix.
Frequently asked questions
Got questions about creating your own rain trough garden? Here are some of the most common ones—plus quick, practical answers to help you get started without the guesswork!
Can I use any old rain trough for gardening?
Avoid troughs made of treated wood or toxic materials like asbestos. Opt for untreated cedar, galvanized metal, or food-safe plastic instead. If repurposing an old trough, clean it thoroughly with soapy water and rinse well to remove contaminants. Pro tip: Drill drainage holes if they’re missing!
What’s the best time of year to set up a rain trough garden?
Spring or early fall is ideal—mild temps and steady rain help roots establish. Avoid extreme heat (summer) or freezing temps (winter), which can stress young plants. If you’re in a warm climate, late winter works too, as long as frost isn’t a risk.
Which plants thrive in a rain trough garden?
Climbing plants like jasmine, ivy, or passionflower love the vertical space, while herbs such as basil, thyme, and mint thrive in shallow troughs. Avoid heavy rooters like pumpkins—they’ll outgrow the space fast! Bonus: Succulents and strawberries also adapt well.
How do I keep my trough from overflowing or leaking?
Ensure the trough has drainage holes at the lowest point to prevent waterlogging. Place a tray or saucer underneath to catch runoff. For overflow, add a small overflow spout or angle the trough slightly downward. Troubleshooting: If leaks persist, seal gaps with silicone caulk (use waterproof type).
What if my trough garden isn’t getting enough rain?
Supplement with a gentle watering can or drip irrigation during dry spells. Group troughs together to maximize humidity, or cover the soil with mulch to retain moisture. Remember: Overwatering is worse than underwatering—stick your finger in the soil first!
Do I need special tools to maintain it?
Basic tools like pruning shears, a small trowel, and gloves are enough! Remove dead leaves monthly, trim overgrown plants, and fertilize lightly every 4–6 weeks. For pests, a neem oil spray works wonders—no fancy equipment needed!
Wrapping up and next steps
A rain trough garden transforms overlooked spaces into lush, vertical green havens—perfect for thriving herbs, climbing plants, and even edible delights! 🌱 With minimal effort, you’ve created a sustainable, water-wise oasis that adds beauty and functionality to your home.
Whether you’re a seasoned gardener or just starting out, this project proves that creativity and nature can grow together.
Ready to take the next step? Start small—pick your favorite plants, gather your materials, and let your rain trough garden flourish! Share your progress with fellow green thumbs or explore more DIY projects to keep the magic alive.