Tools
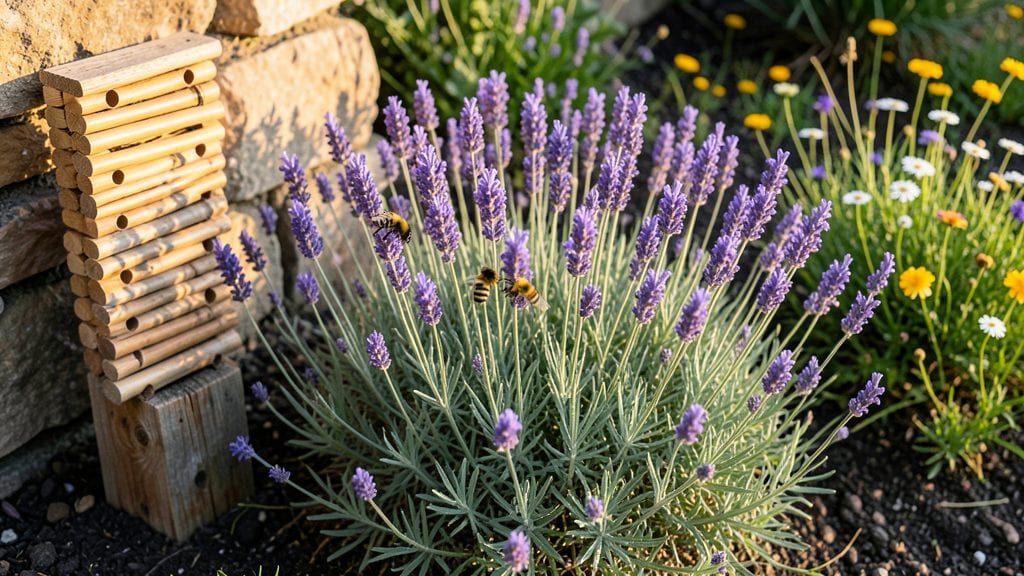
Creating a bee-friendly garden transforms your yard into a buzzing, vibrant ecosystem where pollinators thrive year-round. 🌿 I’ll never forget the first time I saw honeybees swarming my lavender—it felt like my garden had come alive.
The key isn’t just planting flowers; it’s designing spaces that provide food, shelter, and water in every season.
Start with native plants like coneflowers, milkweed, and wild bergamot—they’re bee magnets because they’ve evolved together. Cluster them in groups of three or more so bees can find them easily, and mix heights for continuous blooms from spring through frost.
Don’t forget herbs like thyme, oregano, and borage—their fragrant flowers are irresistible to pollinators.
You’ll end up with a garden that hums with activity, where every visit reveals new pollinators—bumblebees, solitary bees, and butterflies. The air fills with the sweet scent of blooms, and your plants produce more fruit and seeds than ever before.
Even a small space can become a thriving haven with the right layout.
This approach works for any yard size, from city balconies to rural acres. The best part? You’re not just growing flowers—you’re creating a lifeline for bees and other pollinators. Let’s turn your garden into their favorite stopover.
📚 In This Guide
- What you need
- Instructions
- Tips and common mistakes
- Wrapping up and next steps
What you need
- ● Native flowering plants: Choose at least 5-10 varieties (e.g., lavender, coneflowers, milkweed, bee balm, or sunflowers). Aim for 3-5 plants per species to ensure continuous blooms.
- ● Perennial herbs: Plant thyme, oregano, or rosemary (1-2 plants each) for long-lasting nectar.
- ● Water source: A shallow dish (1-2 inches deep) with pebbles or a small birdbath (place on the ground, not elevated).
- ● Mulch: 2-3 inches of organic mulch (e.g., wood chips or straw) to retain moisture and suppress weeds.
- ● Pesticide-free soil: Test soil pH (ideal: 6.0-7.0) and amend with compost if needed.
- ● Gardening gloves (1 pair) – Protect your hands from thorns and dirt.
- ● Hand trowel or transplant spade – For planting small to medium-sized plants.
- ● Pruners – Bypass pruners (sharp, clean cuts) for trimming dead blooms.
- ● Watering can or hose with a gentle nozzle – Avoid blasting water on bees.
- ● Measuring tape or ruler – For spacing plants correctly (12-24 inches apart, depending on variety).
- ○ Optional: Bee hotel (for solitary bees) – 1-2 units placed in a sunny, sheltered spot.
- ● Pollinator-friendly fence panels – If space is limited, vertical gardens work too!
- ● Label markers – To track plant varieties and blooming seasons.
- ● Sunlight access: At least 6-8 hours of direct sun per day for most pollinator plants.
- ● Well-draining soil: Avoid waterlogged areas—bees dislike soggy roots!
- ● Pesticide-free zone: No neonicotinoids or broad-spectrum insecticides—even "organic" sprays can harm bees.
- ● Year-round planning: Research early spring, summer, and fall bloomers to ensure food sources in every season.
Step-by-Step instructions for creating a bee-friendly garden
Transform your yard into a buzzing haven with this simple, science-backed approach.
🌱 Step 1: Plan a Year-Round Bloom Sequence
Bees need food from early spring through late fall. Start by selecting plants that bloom in overlapping 4-6 week intervals. I like to begin with early spring bloomers like crocus and violets, then transition to lavender and coneflowers by summer, and finish with asters and goldenrod in fall. This ensures bees always have fresh nectar and pollen.
Sketch a simple garden map showing where each plant will go. Place taller plants like sunflowers and bee balm at the back, medium-height like salvia in the middle, and low-growing like thyme and creeping phlox at the front. This creates easy access for bees to forage from the ground up.
☀️ Step 2: Choose Native and Bee-Loved Varieties
Native plants are the best choice because they've evolved with local pollinators. I always include at least 50% native species in my designs. Some top performers are purple coneflower, black-eyed Susan, and butterfly weed. Non-native but bee-friendly options include lavender, borage, and Russian sage.
Look for plants with flat or tubular flowers—these shapes make it easy for bees to access nectar. Avoid double-flowered varieties (like many hybrid roses) because their extra petals block the reproductive parts bees need. Stick to single-bloom varieties whenever possible.
💧 Step 3: Provide Water Sources
Bees need water too, especially during dry spells. I create shallow water sources by placing flat stones in a shallow dish filled with water. The stones give bees a safe landing spot while keeping them from drowning. Place these stations in partial shade to prevent rapid evaporation.
Add a small amount of sand to the water to give bees something to grip onto. You'll see them drinking within days. I place water sources near but not directly in planting beds to keep the area clean and reduce mosquito breeding.
✂️ Step 4: Avoid Chemicals and Create Safe Shelter
Never use pesticides, herbicides, or fungicides in your pollinator garden. Even "organic" sprays can harm bees. Instead, hand-pull weeds and use physical barriers like row covers for pest control. I also leave some leaf litter and bare soil patches—these provide habitat for ground-nesting bees like mason bees.
Add a small brush pile or leave standing dead stems from perennials. These give solitary bees places to nest. You'll notice more activity in these areas as the season progresses. Keep a few bare spots of soil too—many bee species nest directly in the ground.
🪴 Step 5: Maintain with Bee Needs in Mind
Water deeply but infrequently—once a week during dry periods is usually enough. Bees prefer plants that aren't overwatered. I check soil moisture by sticking my finger 1 inch deep—if it's dry, that's when I water. Always water in the early morning to give flowers time to dry before evening.
Deadhead spent blooms regularly to encourage continuous flowering. However, leave some seed heads standing through winter—they provide food for bees early in the season and shelter for overwintering insects. Cut back only in early spring when new growth appears.
Tips & tricks for perfect bee-friendly gardening
Creating a thriving pollinator garden takes more than just planting flowers—it's about understanding what bees truly need throughout the seasons.
Seasonal Planning: The 4-6 week bloom intervals in Step 1 are crucial for maintaining a consistent food source. I recommend creating a simple chart to track your plants' bloom times—this helps visualize gaps and ensures you're always providing nectar. For example, if your spring bloomers fade by late May, have summer options like lavender ready to take over. Consider adding a few early spring bulbs like crocus that emerge through snow for the earliest pollinators.
Native Plant Selection: When choosing your 50% native species (as mentioned in Step 2), prioritize plants that are native to your specific region. Local nurseries often carry these varieties, and their staff can provide excellent recommendations. For instance, if you're in the eastern U.S., look for native milkweed varieties—bees adore them! Remember that native plants often require less water once established, making them more sustainable for your garden.
Water Source Design: For Step 3's water stations, I've found that adding a small amount of unsweetened honey to the water can attract even more bees. The scent draws them in, and they'll still drink safely from the stones. Place these stations about 10 feet from planting beds to give bees a clear path from food to water. You might also consider adding a few marigolds nearby—their bright color helps bees locate the water source more easily.
Shelter Creation: The brush piles and standing stems in Step 4 are fantastic for solitary bees, but you can enhance their effectiveness by leaving some areas completely undisturbed. Create small "wild corners" where you don't mow or rake. These areas become perfect nesting sites for ground-nesting bees. I've seen mason bees emerge from these spots in early spring, which is always exciting to watch!
Pro Tips for Bee Friendly Gardening
- Creating a thriving pollinator garden takes more than just planting flowers—it's about understanding what bees truly ...
- Seasonal Planning: The 4-6 week bloom intervals in Step 1 are crucial for maintaining a consistent food source. I rec...
- Native Plant Selection: When choosing your 50% native species (as mentioned in Step 2), prioritize plants that are na...
Frequently asked questions
Got questions about creating a buzz-worthy garden? Here are answers to the most common ones to help you get started on your bee-friendly gardening journey!
What are the easiest flowers to plant for bees?
Start with bee favorites like lavender, sunflowers, coneflowers, and bee balm—these are low-maintenance and packed with nectar. Native wildflowers (e.g., milkweed or goldenrod) are also great choices since they’re adapted to your local ecosystem and require minimal care.
When is the best time to plant bee-friendly flowers?
For most regions, spring (after the last frost) and early fall are ideal. Planting in layers—early bloomers (e.g., crocus), mid-season (e.g., black-eyed Susans), and late-season (e.g., asters)—ensures year-round food for bees. Always check your local frost dates for timing!
Can I use pesticides in a bee-friendly garden?
No!
Pesticides—even "bee-safe" ones—can harm bees by contaminating pollen or water. Instead, opt for organic pest control, like companion planting (e.g., marigolds repel aphids) or handpicking pests. If you must use sprays, do so only at night when bees aren’t active.
How can I attract bees if I live in an urban area?
Urban gardens can still thrive! Use vertical space (e.g., hanging baskets with thyme or nasturtiums) and container gardening for herbs like basil or oregano. Avoid large lawns—replace them with clover or native grasses. Even a small windowsill herb garden helps!
What do I do if bees seem uninterested in my garden?
Check these fixes:
- Water source: Add a shallow dish with pebbles (so bees don’t drown).
- Diversity: Plant in clusters (3+ same flowers) for easier foraging.
- Timing: Bees prefer morning sun (6 AM–10 AM) for warmth.
- Patience: It takes 2–3 weeks for flowers to attract consistent visitors.
Pro Tip:
Leave some wild areas (e.g., leaf litter or bare soil) for ground-nesting bees—they’re essential pollinators too! Avoid "tidy" gardens; a little mess = more bee real estate.
Wrapping up and next steps
Creating a bee-friendly garden isn’t just about adding beauty—it’s a powerful way to support our buzzing friends and boost biodiversity! 🐝 By choosing native plants, avoiding pesticides, and providing water sources, you’ve already taken steps to turn your garden into a thriving pollinator paradise.
Every small change makes a big difference, and your efforts will ripple through the ecosystem.
Ready to take it further? Start small:
- 🌱 Add one new pollinator-friendly plant this season.
- 📸 Share your garden’s progress with local conservation groups.
- 📚 Dive deeper—explore certified native plant lists or join a community garden project.