Tools
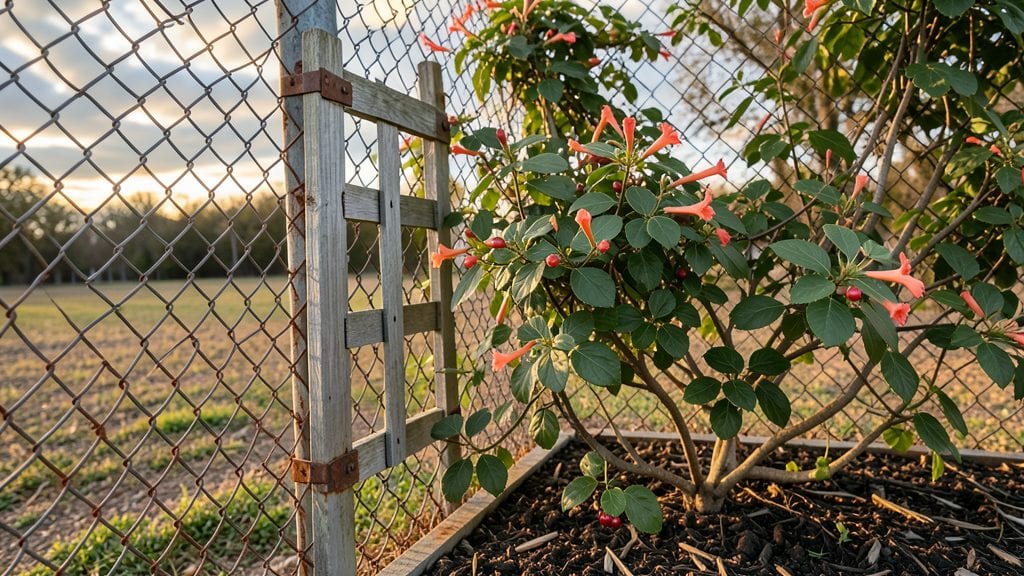
Transforming that bare chain link fence into a lush, living privacy screen is easier than you think—and it’s one of the most satisfying garden upgrades I’ve ever done.
The fence stays sturdy while becoming a vertical garden that blooms from spring to fall, cutting down on noise and giving you a green wall that neighbors will envy.
I’ve turned mine into a thriving mix of climbing roses, morning glories, and even edible greens, all while keeping the original fence’s durability intact.
You don’t need fancy supplies to get started—just some basic hardware, weather-resistant materials, and plants that love to climb. I used a simple wire mesh attachment system to create pockets for soil, and within weeks, the fence transformed from an eyesore into a fragrant, flowering barrier.
The best part? It’s cost-effective and lasts for years, unlike flimsy fabric screens that fade or tear. Plus, you’ll save money by growing your own flowers or herbs instead of buying them.
Imagine waking up to a wall of vibrant blooms or reaching out to snip fresh basil for dinner right from your fence. This project works for any climate and space—whether you’ve got a small urban yard or a sprawling backyard.
The key is choosing the right plants: fast-growing vines like jasmine or clematis for quick coverage, or heartier climbers like wisteria for long-term beauty. By summer’s end, you’ll have a living screen that’s both functional and stunning.
Ready to turn your fence into a garden? I’ll walk you through the exact steps I used, from attaching the mesh to selecting the best plants for your zone. No green thumb required—just a little patience and the right tools. Let’s get growing!
📚 In This Guide
- What you need
- Instructions
- Tips and common mistakes
- Wrapping up and next steps
What you need
- ● Chain link fence fabric: 1 roll (length depends on fence height—common options: 4 ft, 6 ft, or 8 ft). Width: Standard 16.5 ft (50 ft roll) or custom lengths (check local building codes for height/width restrictions).
- ● Metal fence posts: Galvanized steel or vinyl-coated (quantity: 1 post every 6–8 ft). Depth: Buried 2–3 ft below ground (use a post hole digger or auger).
- ● Concrete: Quick-setting or standard mix (quantity: ~1 bag per post or pre-mixed bags). Gravel (¾" crushed stone) for drainage at the post base.
- ● Fence tension tools: Tension bars or clips (included with some kits) to secure fabric taut.
- ● Hardware: Z-braces or tension bands (for stability). Screw-in or bolt-on connectors (check compatibility with your posts).
- ● Measuring tape (25+ ft for accuracy).
- ● Post hole digger or auger (manual or powered).
- ● Level (to ensure posts are plumb).
- ● Shovel & wheelbarrow (for gravel/concrete mixing).
- ● Wire cutters (for trimming chain link fabric).
- ● Drill/driver (for securing hardware).
- ● Safety gear: Gloves, goggles, and sturdy boots.
- ● Privacy slats: Wooden, vinyl, or composite panels to attach to the chain link for extra coverage.
- ● Gate kit: Pre-assembled gate with latch/hinge hardware (if needed).
- ● Post caps: Decorative or protective caps for a polished look.
- ● Fence staples or ties: For securing fabric to posts (if not using tension bars).
- ● Landscape fabric: To prevent weeds from growing at the base.
Step-by-Step instructions for building a chain link garden fence
Transform your yard into a secure, private retreat with this straightforward approach.
Measure and Mark Your Fence Line
Start by measuring the exact length and height of your fence using a tape measure. For a standard 6-foot-tall fence, mark the line with wooden stakes spaced 6 feet apart—this matches the width of most chain link rolls. Use a 4-foot level to ensure all stakes are perfectly vertical before driving them into the ground. I like to tie a string between the stakes to visualize the fence line clearly.
Check for any obstacles like utility lines or uneven terrain. If you encounter slopes, adjust your measurements to account for the grade—this prevents sagging or uneven sections later. Dig a trench along your marked line that’s 12 inches wide and 12 inches deep using a shovel or trenching tool. This depth ensures stability for the posts.
Install Concrete Footings and Posts
Place a concrete mixing bag (or pre-mixed concrete) into the trench at each stake location. Follow the instructions on the bag to mix the concrete—you’ll need about 1 bag per post for a 6-foot-tall fence. Pour the concrete into the trench around each stake, leaving the top 2 inches of the stake exposed above the concrete. Use a 2x4 board to tap the stake into place while the concrete sets.
Let the concrete cure for at least 24 hours before proceeding. This step is critical—rushing here leads to wobbly posts and an unstable fence. Once cured, attach the chain link fence posts to the concrete stakes using post caps and lag screws. Make sure the posts are level and plumb before tightening everything down. If you’re working with a helper, one person can hold the post steady while the other secures the hardware.
Attach the Chain Link Fabric
Unroll the chain link fabric along the first post, ensuring it’s taut but not stretched. Secure the top of the fabric to the post with fence ties or zip ties, starting at one corner and working your way along. Use a tension tool or a helper to pull the fabric tight as you go—this prevents sagging over time. For a 6-foot-tall fence, you’ll need two sections of fabric per post, overlapping slightly at the midpoint.
Once the fabric is secured at the top, fold the bottom edge over the trench and attach it to the bottom rail of the post using more fence ties. Double-check that the fabric is level and even—uneven sections look unprofessional and can trap debris. If you’re installing gates, leave a 3-foot gap between posts for smooth operation. Use gate hinges and latches to ensure they swing freely and securely.
Add Finishing Touches for Longevity
Install barbed wire at the top of the fence if security is a priority—this deters intruders while keeping pets and children safe. Use staple guns to attach the wire to the top rail of each post, ensuring it’s taut and level. For extra durability, apply a metal coating spray to the chain link fabric to prevent rust and extend its lifespan. This step is especially useful if you live in a humid or coastal area.
Finally, add privacy slats or vinyl coating to the chain link if you want to block visibility while maintaining airflow. These accessories snap onto the fabric and can be removed or replaced easily. Sweep away any debris from the trench and around the base of the fence to keep it looking clean. A quick inspection after installation ensures everything is secure and ready for year-round use.
Tips & tricks for perfect chain link garden fence installation
A few simple tricks will help you avoid common mistakes and ensure your chain link fence lasts for years.
Precision in Step 1: When marking your fence line in Step 1, use a laser level instead of a 4-foot level if you have one—it saves time and guarantees perfect alignment. I've learned this the hard way after realizing my fence leaned slightly because of uneven stakes. Double-check your measurements at both ends of the line to catch any discrepancies early.
Concrete Curing Strategy: The 24-hour concrete curing time in Step 2 is non-negotiable, but you can speed up the process slightly by keeping the posts moist with a spray bottle for the first 12 hours. This prevents cracking and ensures maximum strength. If you're working in hot weather, cover the concrete with plastic sheeting to retain moisture during curing.
Fabric Tension Technique: In Step 3, when attaching the chain link fabric, work in small sections—no more than 10 feet at a time. This makes it easier to maintain even tension. I recommend using a helper to pull the fabric taut while you secure it; otherwise, you'll end up with sagging in the middle. A tension tool is worth the investment for longer fences.
Gate Installation Detail: For gates mentioned in Step 3, leave that extra 3-foot gap between posts but don't forget to install the hinges on the post that will bear the most weight. Most people assume it doesn't matter, but proper hinge placement prevents the gate from sagging over time. Also, use three hinges instead of two for gates wider than 4 feet for added stability.
Pro Tips for Chain Link Garden
- A few simple tricks will help you avoid common mistakes and ensure your chain link fence lasts for years.
- Precision in Step 1: When marking your fence line in Step 1, use a laser level instead of a 4-foot level if you have one—it saves time and guarantees perfect alignment.
- Concrete Curing Strategy: The 24-hour concrete curing time in Step 2 is non-negotiable, but you can speed up the process slightly by keeping the posts moist with a spray bottle for the first 12 hours.
Frequently asked questions
Got questions about installing and maintaining a chain link garden fence for privacy and security? Here are some common concerns—and their answers—to help you plan with confidence.
What’s the best way to add privacy to a chain link fence without blocking airflow?
Use privacy slats, vinyl coatings, or decorative lattice panels—these let light and air through while keeping prying eyes out. For a budget-friendly fix, wrap the fence with bamboo or wooden slats (secure with zip ties or screws). Pro tip: Opt for semi-transparent materials like polycarbonate panels for a modern look.
How long does it take to install a chain link fence for a small garden (e.g., 10x10 ft)?strong>
For a DIYer with basic tools, expect 4–8 hours for a 10x10 ft fence, including digging posts, stretching wire, and adding gates. Renting a post-hole digger and fence tensioner cuts time. Pro tip: Pre-cut materials and work with a helper to speed up assembly.
Is a chain link fence more cost-effective than wood or vinyl for long-term use?
Yes!
Chain link costs $5–$15 per linear foot (installed), while wood or vinyl can run $15–$30+. It’s low-maintenance (no painting/staining) and lasts 20–30 years with proper care. Trade-off: Less aesthetic appeal unless you add privacy screens or plants.
How do I fix sagging or loose chain link fence sections?
Start by tightening the tension wires with a fence tensioner. If posts are loose, dig around them, add concrete footings, and let cure for 24 hours. For bent/missing wire, replace the damaged section with new chain link fabric (cut to size and reattach with staples or clips). Warning: Never skip securing posts—sagging worsens over time!
Can I grow vines or plants on a chain link fence for natural privacy?
Fast-growing climbers like bamboo, ivy, or wisteria thrive on chain link. Key tips: Use trellis netting for support, water regularly, and choose non-invasive species (e.g., avoid English ivy in warm climates). For quicker coverage, opt for privacy shrubs (like arborvitae) planted along the base.
Wrapping up and next steps
A chain link garden fence isn’t just a practical privacy screen—it’s a versatile, durable, and cost-effective solution for year-round security and style.
Whether you’re protecting your property, adding a pop of industrial charm, or creating a safe space for pets and plants, this fence delivers big results with minimal fuss. 🌿✨
Ready to transform your outdoor space? Start by gathering your materials, measuring carefully, and tackling one section at a time. Your dream secure garden is just a few steps away! 🛠️💪