
Tools
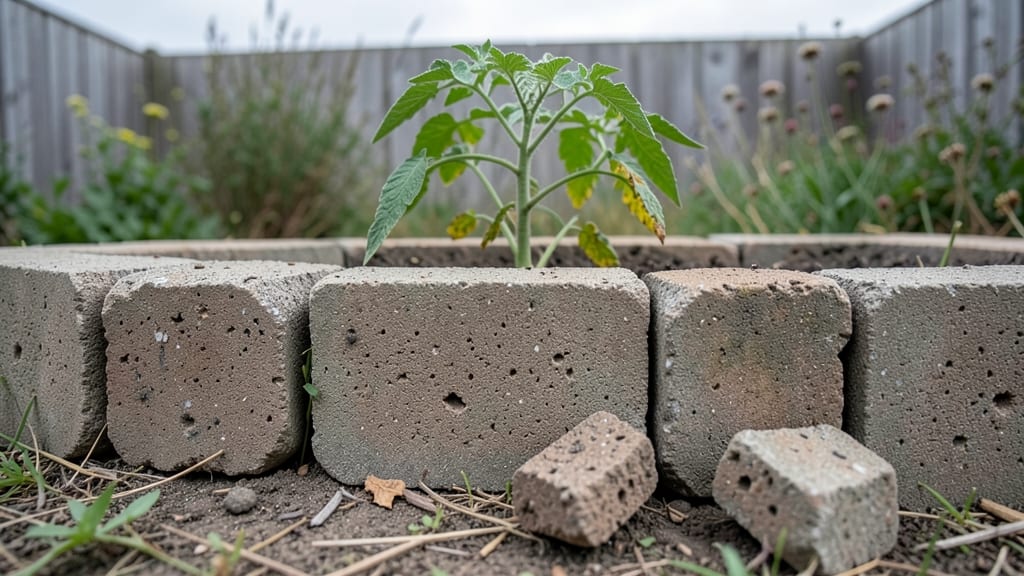
Building a cinderblock garden bed changed how I garden—no more bending over, no more weeding nightmares, and plants that thrive all year long. The blocks stack like LEGOs, creating sturdy, customizable beds that last decades with almost no upkeep.
I started with a simple 4x4-foot rectangle, but the possibilities are endless: vertical towers, tiered planters, or even a spiral design for small spaces.
Here’s the best part: cinderblocks are weatherproof, drain well, and won’t rot like wood. You’ll need basic tools—a level, trowel, and gloves—and a few hours to assemble. The soil depth works for most veggies (12–18 inches), and you can paint the blocks or leave them natural for a rustic look.
My first bed cost under $50 and still looks brand new after three years.
Once built, you’ll fill it with plants that love structure—herbs, lettuce, strawberries, or even dwarf tomatoes. The edges keep soil in place, and the blocks wick away excess moisture, so roots stay happy.
By summer’s end, you’ll have a garden that’s both beautiful and shockingly productive, with less effort than traditional beds.
Perfect for urban balconies, backyard corners, or even a front-yard planter. The key is playing with height and shape—let your creativity run wild. Ready to transform a patch of yard into a low-maintenance garden oasis?
📚 In This Guide
- What you need
- Instructions
- Tips and common mistakes
- Wrapping up and next steps
What you need
- ● Cinderblocks (concrete blocks): 12–24 blocks (depending on bed size; standard 16" x 8" x 8" blocks work well).
- ● Gravel or crushed stone: 2–3 bags (for drainage and base layer).
- ● Landscape fabric: 1 roll (to block weeds and retain moisture).
- ● Garden soil or potting mix: 1–2 cubic yards (or enough to fill your bed to desired height).
- ● Plants of choice: Seeds, seedlings, or mature plants suited to your climate.
- ● Wheelbarrow or shovel: For moving gravel and soil.
- ● Level: To ensure your blocks are even.
- ● Rubber mallet or hammer: For tapping blocks into place.
- ● Safety gloves and eye protection: Always prioritize safety!
- ○ String and stakes (optional but helpful): For marking bed layout before building.
- ● Mortar or adhesive: For a permanent, seamless look (if you want to skip gaps).
- ● Drainage pipe: If your area has poor drainage.
- ● Decorative elements: Paint, pebbles, or mosaic tiles for a personalized touch.
- ● Drip irrigation kit: For hassle-free watering.
Step-by-Step instructions for building a cinderblock garden bed
Here’s how to create a sturdy, long-lasting garden bed that requires minimal upkeep while delivering year-round growing space.
Plan and Measure Your Layout
First, decide on the size and shape of your cinderblock garden bed. A 4-foot-by-8-foot bed is ideal for most gardeners, providing ample space for a variety of plants while keeping maintenance manageable. Use a tape measure to mark the dimensions on the ground, ensuring the area is level—uneven ground will cause drainage issues or structural instability. For a 4-serving layout, plan for at least 16 square feet of planting space, which allows room for both crops and pathways between blocks.
Sketch a rough design if needed, but remember cinderblocks are versatile—you can create curves by cutting blocks or arrange them in a square, rectangle, or even a spiral. Avoid placing the bed directly against a house or fence unless you account for proper drainage; water pooling against foundations can cause long-term damage. I like to leave at least 6 inches of clearance on all sides for easy access and airflow.
Prepare the Base and Level the Ground
Clear the marked area of grass, weeds, or debris, then dig down 4-6 inches to create a firm, level base. This depth ensures stability and prevents shifting over time. Use a shovel to loosen the soil and remove any rocks or roots that could interfere with drainage. For extra durability, especially in clay-heavy soil, lay down a 2-inch layer of coarse sand or gravel to improve drainage and prevent waterlogging.
Check for level frequently with a 2-foot level or a straight board and a spirit level. If the ground isn’t perfectly even, adjust by adding or removing soil as needed. Compact the base lightly with a hand tamper or by walking over it—this prevents the blocks from sinking unevenly. A solid foundation is critical; skipping this step often leads to wobbly beds that collapse under plant weight or foot traffic.
Assemble the Cinderblocks and Create the Frame
Start by placing the first row of cinderblocks along one of the long sides of your marked layout. Use a rubber mallet to tap blocks into place if needed, but avoid forcing them—misaligned blocks will create gaps that let soil spill out. For a 4-foot width, you’ll need 8 standard 16-inch cinderblocks per row (accounting for mortar joints). Leave the top of the blocks 2-3 inches above ground level to prevent erosion and make weeding easier.
Build the frame by stacking blocks in a running bond pattern (staggered like brickwork) for added stability. Use concrete masonry adhesive instead of mortar for faster assembly and easier repairs. As you work, check the corners frequently to ensure 90-degree angles—use a speed square or a straight board to verify alignment. Once the frame is complete, fill the interior with native soil amended with compost (about 12 cubic feet for a 4x8-foot bed).
Reinforce and Fill for Long-Term Stability
To prevent the blocks from shifting over time, especially in windy or high-traffic areas, reinforce the corners and center of each long side with additional blocks or metal rebar. Drive 12-inch rebar stakes into the ground at each corner and midway along the long sides, then secure the blocks to them with adhesive. This step is non-negotiable if your bed is taller than 12 inches—without reinforcement, tall beds can tip.
Fill the bed with a 3:1 ratio of topsoil to compost (about 10-12 cubic feet total), mixing thoroughly to ensure even moisture retention and nutrient distribution. Avoid using garden soil directly from your yard—it often compacts and lacks the organic matter needed for healthy roots. Water the soil lightly after filling to settle it, then let it drain. This bed is now ready for planting, and with proper care, it’ll last 10+ years without major repairs.
Maintain Drainage and Extend the Bed’s Lifespan
After planting, monitor the bed’s drainage by checking for standing water after heavy rains. If water pools, add 1-2 inches of coarse sand to the bottom layer or create a slight slope (about 1 inch per 4 feet) toward one end to encourage runoff. Mulch the surface with 2-3 inches of straw or wood chips to suppress weeds, retain moisture, and protect soil from erosion. Replenish mulch seasonally, especially after harvests.
Every 2-3 years, top off the soil with fresh compost to replenish nutrients and prevent compaction. If blocks shift or cracks appear in the adhesive, repair them immediately with more adhesive and a trowel. This bed is designed for durability, but even cinderblocks benefit from occasional TLC. With these steps, your garden bed will stay functional, attractive, and productive for decades.
Tips & tricks for building a sturdy cinderblock garden bed
Creating a cinderblock garden bed that lasts for years requires attention to detail—here are the key strategies I’ve learned from building multiple beds that remain stable and productive for a decade.
Foundation is Everything: The 4-6 inches of dug base in Step 2 isn’t just about depth—it’s about creating a solid platform. I recommend using a plate compactor instead of just walking on the soil, as it provides consistent, even compaction. If your soil is particularly sandy, consider adding a geotextile fabric between the sand layer and native soil to prevent mixing and maintain drainage. This extra step prevents the blocks from settling unevenly over time, which is especially critical if you plan to grow heavy plants like tomatoes or squash.
Block Alignment and Stability: When assembling your frame in Step 3, pay special attention to the running bond pattern—this staggered arrangement distributes weight more evenly than a simple grid. I’ve found that using a string line stretched between two stakes helps maintain perfect 90-degree corners. For extra stability, especially in windy areas, consider using corner braces made from scrap wood or metal angles secured with adhesive. These braces prevent the corners from spreading outward over time, which is a common failure point in many DIY beds.
Soil Mix Matters: The 3:1 ratio of topsoil to compost in Step 4 is a great starting point, but don’t skimp on the quality of your compost. I recommend using well-aged compost (at least 6 months old) to avoid introducing weeds or pathogens to your garden. For beds that will grow vegetables, consider adding 1 cup of bone meal or 2 cups of worm castings per square foot to boost nutrient availability. This extra step ensures your plants have the nutrients they need right from planting, reducing the need for frequent fertilizing later.
Long-Term Maintenance Secrets: The 2-3 inch mulch layer in Step 5 is crucial, but not all mulches are created equal. I prefer straw or shredded leaves over wood chips for vegetable beds because they break down more quickly, adding organic matter to the soil. For beds planted with perennials or shrubs, wood chips last longer and suppress weeds effectively. When topping off soil every 2-3 years, mix in 1/2 inch of vermiculite or perlite to improve aeration and drainage—this simple addition can extend the productivity of your bed by several years.
Pro Tips for Cinderblock Garden Bed
- Creating a cinderblock garden bed that lasts for years requires attention to detail—here are the key strategies I’ve learned from building multiple beds that remain stable and productive for a decade.
- Foundation is Everything: The 4-6 inches of dug base in Step 2 isn’t just about depth—it’s about creating a solid platform.
- Block Alignment and Stability: When assembling your frame in Step 3, pay special attention to the running bond pattern—this staggered arrangement distributes weight more evenly than a simple grid.
Frequently asked questions
Got questions about creating a cinderblock garden bed? You’re not alone! Here are some of the most common queries—and their straightforward answers—to help you get started with confidence.
How do I prevent weeds from growing between the cinderblocks?
Weeds love to sneak in! Line the bottom of your bed with landscape fabric before adding soil, or use a pre-emergent herbicide if weeds are already a problem. For a natural fix, mulch the top of the soil with straw, wood chips, or gravel—just avoid piling it directly against the blocks to prevent moisture buildup.
Can I build a cinderblock garden bed in winter?
Cinderblocks are weather-resistant, so you can assemble your bed anytime. However, planting in cold climates should wait until spring. If you’re prepping the bed early, use landscape fabric to protect soil from freezing and thawing cycles, which can shift the blocks over time.
Are there cheaper alternatives to cinderblocks for raised beds?
Yes! Consider these budget-friendly options:
- Concrete pavers (often sold in bulk at hardware stores)
- Retaining wall blocks (similar durability, sometimes cheaper)
- Untreated wood or pallets (for a temporary, rustic look)
- Bricks or stones (if you’re DIY-savvy and want a natural aesthetic)
How do I fix uneven cinderblocks in my garden bed?
Uneven blocks can cause drainage issues or look messy. If you notice gaps or wobbles:
- Remove the block and level the base with a shovel or tamping tool.
- Add a sand or gravel layer (1–2 inches) underneath for stability.
- For minor adjustments, tap blocks gently with a rubber mallet or add small rocks beneath them.
What’s the best soil mix for a cinderblock garden bed?
Cinderblocks drain quickly, so amend your soil to retain moisture and nutrients. Mix:
- 60% topsoil (or potting soil for containers)
- 30% compost (for organic matter)
- 10% perlite or vermiculite (to improve aeration)
Wrapping up and next steps
A cinderblock garden bed is your ticket to a durable, low-maintenance, and stylish gardening solution—perfect for year-round planting! Whether you’re a seasoned gardener or just starting, this setup offers versatility, affordability, and easy customization to fit any space. 🌱
Ready to transform your outdoor (or indoor!) space? Start by gathering your materials, sketch a simple design, and get building—your future garden awaits! For extra inspiration, browse DIY garden layouts or join gardening communities to share your progress. Happy planting! 🌿