
Tools
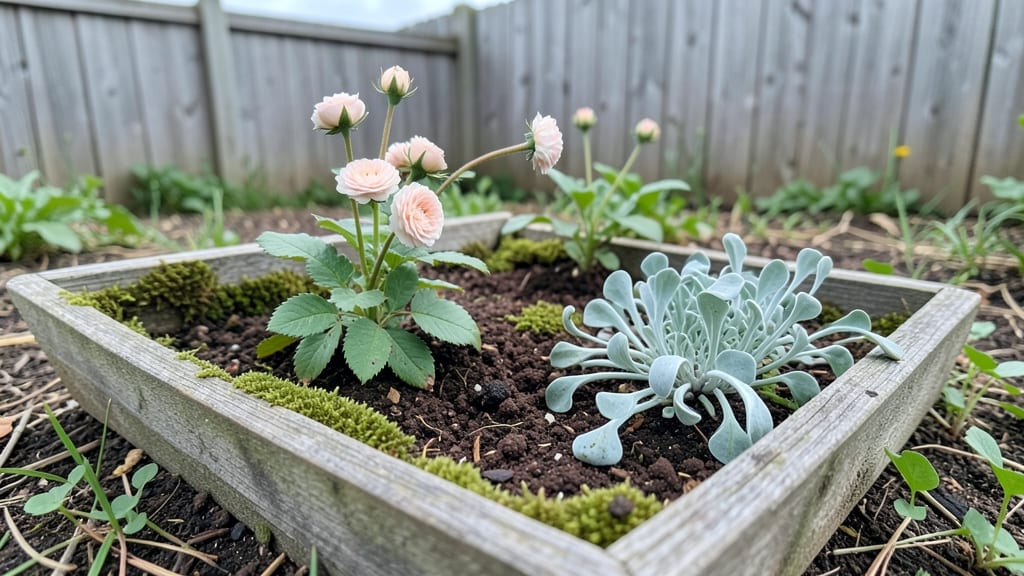
A fairy garden bed transforms a small corner into a magical world where every pebble and leaf feels intentional. I built my first one after seeing how a 12-inch square container became the neighborhood's most talked-about garden feature—no fancy tools, just imagination and a few key supplies.
The secret lies in scaling down real landscapes: tiny paths, miniature furniture, and plants that stay small naturally (think creeping thyme instead of full-sized roses).
Start with a container that fits your space—a half whiskey barrel, a ceramic bowl, or even an old teacup. You’ll need pebbles for drainage, moss for texture, and dwarf plants like ferns or miniature hostas that thrive in tight quarters.
The whimsy comes from the details: a mushroom cluster made from painted stones, a tiny picket fence from toothpicks, or a winding path of crushed shells. Even my black thumb can’t kill these—most fairy garden plants need minimal care once established.
By the time you’re done, you’ll have a year-round display that feels like stepping into a storybook. The moss stays lush with occasional misting, the flowers bloom in jewel-toned bursts, and the entire setup fits on a patio table or windowsill.
Kids swear they see fairies visiting at dusk (I won’t argue with that). The best part? You can theme it—woodland, cottagecore, or even a desert oasis—without breaking the bank.
Fairy gardens work in any climate, from sunny balconies to shaded porches. The key is choosing plants that match your light conditions and keeping the soil moist but not soggy.
Once you’ve built one, you’ll find yourself collecting tiny treasures for the next project—because the magic isn’t just in the making, but in the joy of tiny, unexpected green spaces.
📚 In This Guide
- What you need
- Instructions
- Tips and common mistakes
- Wrapping up and next steps
What you need
- ● Container: 1 large planter, wooden box, or repurposed container (e.g., ceramic bowl, whiskey barrel, or window box)
- ● Minimum size: 12" x 12" x 6" (deeper for root systems)
- ● Soil: 2–3 bags of well-draining potting mix (avoid garden soil—it compacts too much!)
- ○ Optional: Perlite or sand (1 cup) for extra aeration
- ● Miniature Plants: 3–5 small succulents, ferns, or dwarf shrubs (e.g., sedum, moss, or creeping thyme)
- ● 1–2 tiny flowering plants (e.g., miniature roses, pansies, or fairy bells)
- ● Decor: Pebbles or gravel (1–2 lbs for drainage layer)
- ● Moss sheets (1–2 sheets for ground cover)
- ● Miniature rocks, logs, or bark slices (5–10 pieces)
- ● Tools: Trowel or small hand shovel
- ● Spray bottle (for misting plants)
- ● Scissors or pruners (for trimming moss/plants)
- ● Measuring tape or ruler (for spacing)
- ● Fairy door or tiny furniture (e.g., mushroom stools, acorn cups)
- ● Miniature figurines (fairies, gnomes, or animals)
- ● Twinkling LED lights or solar-powered fairy lights
- ● Hand-painted pebbles or custom signs (e.g., "Welcome to Enchanted Acres")
- ● Natural elements: Pinecones, feathers, or dried flowers
Step-by-Step instructions for creating a whimsical fairy garden bed
Bring your tiny green space to life with this charming, easy-to-follow guide.
Choose and Prepare Your Container or Garden Spot
Select a shallow container at least 6 inches deep, like a window box, hanging basket, or a 12-inch square tray for ground beds. If using a container, ensure it has drainage holes—fairy gardens hate soggy roots. For ground beds, mark a 12x12-inch square with landscape fabric underneath to prevent weeds from invading your fairy realm.
Line the bottom with 2 inches of small gravel or pebbles to improve drainage. This layer keeps moisture from pooling while allowing roots to establish. If your container is decorative, place the gravel inside before adding soil—it’s easier than trying to fit it later.
Layer Soil and Create Textured Bases
Fill the container or marked area with 3 inches of well-draining potting mix. Press it down lightly to create a firm base, but don’t compact it too tightly—fairy plants need room to grow. For a natural look, mix in 1 inch of coarse sand on top of the soil to mimic a rocky fairy path or garden bed.
Use a small trowel or your fingers to create gentle mounds and dips in the soil. These textures will become the foundation for your fairy garden’s landscape. For a woodland feel, add small pinecones or bark pieces to the soil layer before planting. This step is all about setting the scene—think of it as sketching with nature.
Plant Miniature or Dwarf Varieties
Select plants that stay small, like dwarf ferns, miniature hostas, or creeping thyme. For a fairy-friendly touch, add tiny succulents or moss—they thrive in shallow soil and add whimsy. Space plants 2-3 inches apart, leaving room for fairy-sized pathways. If using annuals, choose slow-growing varieties like miniature impatiens or dwarf petunias to keep maintenance low.
Gently press the soil around each plant to secure it without burying the stems too deep. Water lightly after planting to settle the soil, but avoid soaking it—fairy gardens need consistent moisture, not soggy conditions. If your container doesn’t have drainage, water sparingly to prevent root rot.
Add Decorative Elements and Pathways
Now for the fun part! Use pebbles, moss, or tiny logs to create winding paths or stepping stones for your fairy visitors. Arrange miniature furniture, tiny mushrooms, or hand-painted rocks to bring your garden to life. For a woodland vibe, scatter acorns, pine needles, or dried leaves around the base of plants. Keep decorations lightweight—fairy gardens are delicate, and heavy items can sink or topple.
Place a few small figurines, like fairies, toadstools, or tiny animals, to give your garden personality. Avoid overcrowding; fairy gardens thrive when decorations feel natural and intentional. Step back occasionally to check the balance—your fairy garden should look like it’s been there for years, not hours.
Maintain with Gentle Care
Water your fairy garden 2-3 times a week, checking the soil’s moisture level by touching the top inch. If it feels dry, give it a light drink—fairies prefer their gardens slightly moist but never waterlogged. Fertilize lightly once a month with a diluted liquid fertilizer to keep plants healthy without overpowering the delicate ecosystem.
Every few weeks, tidy up by removing fallen leaves or debris. Replace any washed-away decorations and trim overgrown plants to maintain the fairy-sized scale. With minimal care, your fairy garden will stay enchanting season after season, offering a tiny escape in your green space.
Tips & tricks for perfect fairy garden beds
Creating a fairy garden that feels magical and intentional starts with these simple yet transformative tips that bring the instructions to life.
Drainage is Non-Negotiable: In Step 1, the 2 inches of gravel you add isn't just for show—it's the foundation of a healthy fairy garden. If your container lacks drainage holes, drill a few small holes in the bottom before adding gravel. This prevents root rot and keeps your fairy plants thriving. I've seen containers with hidden drainage systems where the gravel layer is placed inside a removable liner—genius for decorative pieces!
Soil Texture Matters: When you mix in the 1 inch of coarse sand in Step 2, think of it as creating a natural fairy pathway. For a woodland theme, use a mix of sand and small pebbles to mimic a forest floor. Press the soil gently but firmly—it should hold its shape when you touch it but still feel light enough for fairy-sized roots to establish easily.
Plant Placement is an Art: In Step 3, spacing your dwarf plants 2-3 inches apart creates the illusion of a lush fairy meadow. For a woodland scene, place taller plants like miniature ferns toward the back (if your container has depth) and shorter plants like creeping thyme in the front. This simple layering trick makes your garden look professionally designed. And remember, fairy gardens are all about scale—tiny plants deserve tiny spaces!
Decorations Should Feel Natural: In Step 4, when arranging your pebbles and figurines, step back frequently to check the balance. A good rule of thumb is the "three-fifths rule"—leave about 60% of the space empty to create a sense of openness. I've found that placing a few larger decorative elements (like a tiny mushroom or painted rock) creates focal points that draw the eye naturally. And always use lightweight materials—nothing ruins a fairy garden faster than toppled decorations!
Pro Tips for Fairy Garden Bed
- Creating a fairy garden that feels magical and intentional starts with these simple yet transformative tips that bring the instructions to life.
- Drainage is Non-Negotiable: In Step 1, the 2 inches of gravel you add isn't just for show—it's the foundation of a healthy fairy garden.
- Soil Texture Matters: When you mix in the 1 inch of coarse sand in Step 2, think of it as creating a natural fairy pathway.
Frequently asked questions
Got questions about creating your own fairy garden bed? You’re not alone! Here are some of the most common queries—plus quick, practical answers to help you bring your tiny magical world to life.
What’s the best time of year to plant a fairy garden?
Fairy gardens thrive in spring or early fall when temperatures are mild and rain is plentiful. Avoid extreme heat (like summer) or frost (winter), as delicate plants and tiny structures may struggle. If you’re in a warm climate, late winter can work too!
How do I keep my fairy garden from drying out or getting too wet?
Use a mix of well-draining soil (like a 50/50 blend of potting soil and perlite) and place your bed in partial shade to retain moisture. Add a thin layer of mulch (like moss or bark chips) to lock in humidity. For extra protection, group plants together to create a microclimate.
Can I use regular garden tools to build a fairy garden?
Not ideal! Fairy gardens need precision tools like tiny trowels, mini pruners, and even a small rake (or a fork with bent tines). Upcycle items like old spoons, chopsticks, or toothpicks for planting and shaping. For larger structures, toothpicks or skewers work wonders for securing tiny bridges or fences.
What are some low-maintenance plants for beginners?
Start with hardy, slow-growing plants like moss, succulents (like hens-and-chicks), miniature ferns, or creeping thyme. These require minimal watering and thrive in small spaces. Avoid fast-spreading weeds or plants that need frequent pruning—fairy gardens are all about charm, not chaos!
How do I keep pests (like ants or slugs) out of my fairy garden?
Use natural deterrents like a ring of diatomaceous earth (food-grade) around the edges or sprinkle crushed eggshells near plants. For slugs, place copper tape (a cheap DIY trick!) or use beer traps (yes, really!). Avoid chemical pesticides—they’ll harm your tiny ecosystem.
What if my fairy garden looks messy or uneven?
Embrace the whimsy! Fairy gardens are meant to feel organic and enchanting, not perfectly manicured. Trim overgrown plants with tiny scissors, rearrange rocks or pebbles for balance, and add hidden details (like a tiny mushroom under a leaf) to draw the eye. If all else fails, a little fairy dust (glitter!) can work wonders!
Wrapping up and next steps
A fairy garden bed is more than just a charming decoration—it’s a creative outlet that brings joy, tranquility, and a touch of magic to any space. Whether you’re a seasoned gardener or a beginner, these miniature landscapes are easy to customize, eco-friendly, and perfect for sparking imagination. 🌿✨
Ready to dive in? Start small—pick a cozy corner, gather your supplies, and let your creativity flow! Your fairy garden adventure awaits—what whimsical details will you add first?