
Tools
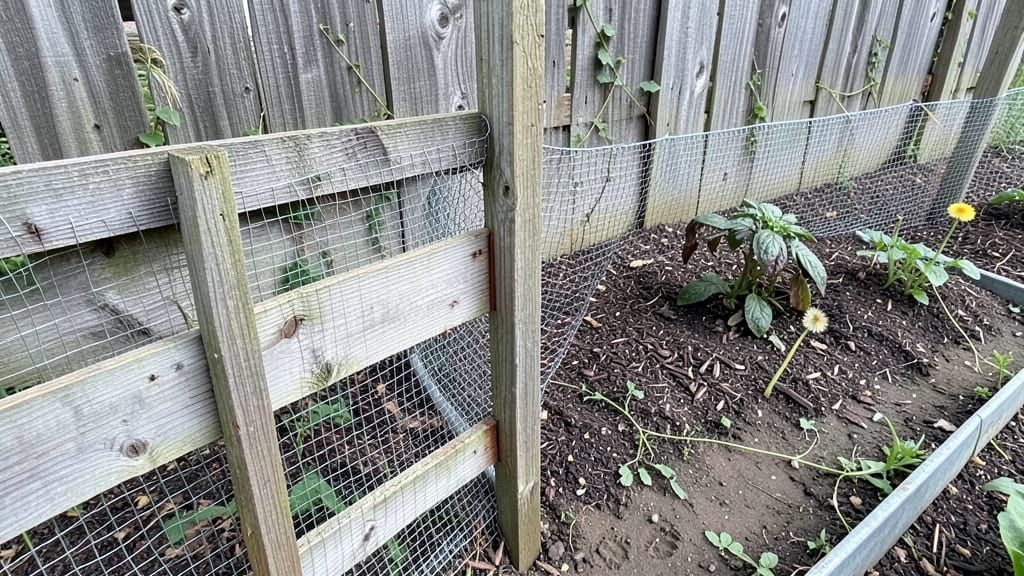
My garden bed enclosures transformed my struggling garden into a pest-proof paradise—no more rabbits nibbling lettuce or squirrels stealing strawberries. The right enclosure keeps critters out while making your garden look intentional and well-maintained, whether you're going for rustic charm or sleek modern lines.
I started with simple cedar planks and now have a system that works for every bed in my yard.
The beauty of enclosures is they solve problems beyond pests: they contain soil, reduce weeds, and even improve drainage. You can use wood, metal, stone, or even repurposed materials like bricks or old pallets.
For my raised beds, untreated cedar lasts years without rotting, while my container gardens use galvanized metal for durability. The key is matching the material to your climate and garden style—no need to overcomplicate it.
Once installed, you’ll notice plants thriving with fewer interruptions. My tomatoes now grow bold and unmolested, and my herbs stay lush instead of getting trampled by curious pets. The enclosures also make gardening more accessible—no more bending over to reach the edges of a sunken bed.
Plus, they elevate the look of your garden, turning functional spaces into focal points that neighbors admire.
Works for everything from small container gardens to large in-ground beds. Whether you're starting fresh or upgrading an existing space, these enclosures are the unsung heroes of a low-stress, high-reward garden. Let’s get your beds protected and looking their best!
📚 In This Guide
- What you need
- Instructions
- Tips and common mistakes
- Wrapping up and next steps
What you need
- ● Fencing or mesh: Hardware cloth (1/4"–1/2" mesh) or sturdy wire mesh (6–8 ft tall, length based on bed perimeter). Pro tip: 💡 Galvanized or PVC-coated mesh resists rust!
- ● Posts/stakes: 4–6 ft wooden or metal posts (spaced 4–6 ft apart). For extra stability, use T-posts or concrete anchors.
- ● Fasteners: Heavy-duty staples, screws, or U-nails (galvanized to prevent corrosion).
- ● Measuring tape & level: Precision ensures a plumb, pest-proof enclosure.
- ● Gloves & safety goggles: Protect your hands and eyes from debris and sharp edges.
- ● Decorative trim: Wooden lattice or bamboo for a polished look.
- ● Solar-powered lights: Deter nocturnal pests while illuminating your garden after dark.
- ● Landscape fabric: Line the base to block weeds and burrowing critters.
- ● Door hinge kit: For easy access to harvest veggies without dismantling the enclosure.
Step-by-Step instructions for building garden bed enclosures
Here’s how to create a sturdy, pest-proof barrier that keeps your garden thriving without the hassle.
Measure and Mark the Garden Bed Layout
Start by measuring the dimensions of your garden bed, including any curves or irregular shapes. Use a 1/4-inch outdoor marker or a stick and soil to outline the perimeter—this will serve as your guide for digging the trench. For a 4-foot-wide bed, aim for a 6-inch-deep trench along the outer edge, which provides enough space for the enclosure frame.
I like to use wooden stakes at each corner and every 4 feet along the length to mark the trench line. Drive them in firmly so they don’t shift when you start digging. Double-check the measurements diagonally to ensure the bed is square or symmetrically shaped before proceeding.
Install the Foundation and Frame
Dig the trench to a depth of 6 inches, removing any rocks or debris that could interfere with the frame. For a 4-foot-wide bed, you’ll need 2x4 lumber cut to the length of each side plus two end pieces. The frame should sit 2 inches below ground level to deter burrowing pests like gophers and moles.
Assemble the frame by screwing the corner posts together with deck screws, ensuring the structure is level. I reinforce the corners with metal brackets for extra stability, especially if you’re using untreated wood that may warp over time. Leave a 1-inch gap between the frame and the trench walls to allow for backfilling with soil later.
Attach the Enclosure Material
For the enclosure itself, hardware cloth with 1/4-inch mesh is ideal—it blocks pests while allowing water and air to penetrate. Cut the cloth to fit the frame, leaving an extra 2 inches on all sides to tuck beneath the soil. Secure it to the frame with staple guns or zip ties, ensuring no gaps remain at the seams.
If you’re using plastic mesh, overlap the seams by 4 inches and staple them tightly. Bury the bottom edge of the mesh 1 inch deep in the trench to prevent digging pests from tunneling underneath. For added durability, I like to wrap the top edge of the mesh with landscape fabric to keep it clean and extend its lifespan.
Backfill and Secure the Enclosure
Refill the trench with the removed soil, pressing it firmly around the frame to eliminate air pockets. The goal is to create a snug fit that stabilizes the structure while keeping the mesh buried. For extra reinforcement, I add a layer of gravel at the base of the trench before backfilling—this improves drainage and deters rodents.
Once the soil is level with the top of the frame, secure the enclosure with galvanized screws or corner brackets to prevent shifting. If you’re using a removable design, leave the top edge of the mesh loose so you can fold it back for planting. For permanent enclosures, trim any excess mesh flush with the frame for a clean finish.
Plant and Maintain the Enclosed Garden
Now that your enclosure is in place, it’s time to plant. Fill the bed with high-quality garden soil and add compost for nutrients. I recommend planting low-growing crops like lettuce, radishes, or strawberries along the edges to make the most of the space. For taller plants, leave 12 inches between them and the enclosure to avoid shading the mesh.
Check the enclosure periodically for signs of wear or gaps, especially after heavy rain. If you notice the mesh pulling away from the frame, secure it again with staples or ties. Over time, the soil may settle, so top up the bed as needed to maintain a level planting surface. With this setup, you’ll see fewer pests and healthier plants all season long.
Tips & tricks for building garden bed enclosures
These practical strategies will help you construct a durable, pest-proof garden enclosure that lasts for years while keeping your plants thriving.
Precision in Step 1: When marking your 6-inch-deep trench in Step 1, use a level to ensure the line is perfectly straight. I've found that using a garden hose filled with water creates a natural plumb line—just bend it into an "L" shape and adjust until the water levels match at both ends. This method eliminates guesswork and ensures your frame will sit perfectly level, which is critical for long-term stability. The 4-foot spacing between stakes also helps maintain consistent depth along curves or irregular bed shapes.
Material Selection: For Step 3, if you're using untreated wood for your frame, consider pre-drilling screw holes to prevent splitting when you attach the corners with deck screws. I recommend cedar or redwood for natural rot resistance—these woods hold up better against moisture than pine over time. For the enclosure material, hardware cloth with 1/4-inch mesh provides the best balance of pest protection and airflow, but if you're dealing with particularly determined pests like raccoons, opt for 1/2-inch mesh instead.
Burial Depth Strategy: The 1-inch deep burial of the mesh bottom in Step 3 is non-negotiable for underground pests, but don't stop there. I add an extra 2 inches of mesh extending outward from the trench edge and bury that as well. This creates a physical barrier that prevents mole tunnels from approaching the bed. For the top edge, leave that extra 2 inches of mesh loose—this makes future maintenance easier when you need to check for wear or adjust the enclosure.
Long-Term Maintenance: In Step 5, when planting your low-growing crops, consider adding a layer of mulch around the base of the enclosure. This helps prevent erosion and keeps the mesh buried as the soil settles over time. I check my enclosures every 6-8 weeks during the growing season, especially after heavy rains, to ensure the mesh hasn't pulled away. A quick staple gun repair takes just minutes and prevents pest entry points from developing.
Pro Tips for Garden Bed Enclosures
- These practical strategies will help you construct a durable, pest-proof garden enclosure that lasts for years while keeping your plants thriving.
- Precision in Step 1: When marking your 6-inch-deep trench in Step 1, use a level to ensure the line is perfectly straight.
- Material Selection: For Step 3, if you're using untreated wood for your frame, consider pre-drilling screw holes to prevent splitting when you attach the corners with deck screws.
Frequently asked questions
Got questions about garden bed enclosures?
You’re not alone! Here are some of the most common concerns—and straightforward answers—to help you get started with confidence.
What’s the best material for a garden bed enclosure?
Hardware cloth (1/4-inch mesh) is the gold standard for keeping out rodents and burrowing pests, while chicken wire works for larger critters like rabbits. For a decorative touch, try lattice panels or woven willow fencing—just ensure they’re securely fastened!
When is the best time to install an enclosure?
Spring is ideal, but don’t wait! Install before planting to protect seedlings from ground-dwelling pests. If you’re retrofitting an existing bed, do it in early fall to give roots time to establish before winter. Just avoid extreme heat or freezing temps for easier assembly.
Are there budget-friendly alternatives to commercial enclosures?
Repurpose old fencing, pallet wood, or even sturdy cardboard tubes (for small beds) with a coat of pesticide-free sealant. DIY options like bent wire hoops over hoop houses can also work—just bury the base 6+ inches deep to deter diggers.
How do I keep squirrels and raccoons out of my enclosed bed?
Combine a tight mesh (1/4-inch or smaller) with a slight outward slope on the top edge—this prevents climbing. Add a 2-foot overhang of mesh or a wire baffle above the bed to block aerial pests. For extra security, sprinkle hot pepper flakes or predator urine (like fox) around the perimeter.
What if my enclosure collapses or gets damaged?
Check for loose stakes, rusted hardware, or gaps every few weeks. Reinforce weak spots with additional stakes or zip ties, and patch holes with mesh or hardware cloth. For wood frames, sand rough edges to deter pests from chewing through. A little maintenance goes a long way!
Wrapping up and next steps
Creating a sturdy garden bed enclosure is your secret weapon for thriving plants—free from pests, critters, and chaos! 🌱 Whether you’re using hardware cloth, wooden frames, or decorative fencing, the right setup keeps your greens safe while adding charm to your yard.
Now that you’ve got the know-how, it’s time to roll up those sleeves and build your dream garden fortress!
🔨 Next step: Grab your tools, pick a design, and start digging—your lush, pest-free garden awaits! 🌿