
Tools
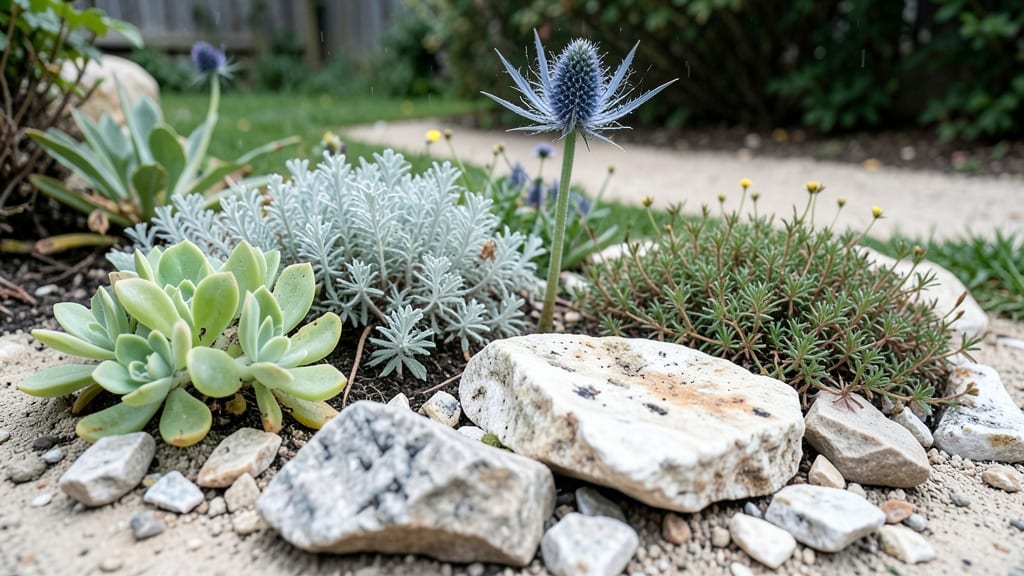
A limestone garden bed transforms your yard with natural stone layers that feel like stepping into a Mediterranean hillside. 🌿 The rough texture and warm tones add rustic charm while solving drainage problems—no more soggy roots or washed-out soil.
I built mine last spring, and the way sunlight catches the edges at dusk makes it feel like a secret garden spot.
This isn't just about looks—limestone naturally raises soil pH, creating ideal conditions for drought-tolerant plants like lavender, sedum, or native wildflowers. You'll need crushed limestone (about 2-3 inches deep), topsoil, and your chosen plants. The setup takes a weekend, and once established, it requires almost no maintenance beyond occasional weeding.
Imagine walking past silvery foliage that shimmers in the breeze, with clusters of purple blooms spilling over the edges. Your bed will thrive with minimal watering, resist erosion, and become the focal point of your garden.
The key is pairing plants that love alkaline soil—think thyme, rosemary, or even ornamental grasses for texture.
Works beautifully in borders, slopes, or as a raised bed centerpiece. The stone stays cool in summer and warms in winter, making it perfect for year-round interest. Start with a small section if you're unsure—once you see how easy it is to maintain, you'll want to expand.
📚 In This Guide
- What you need
- Instructions
- Tips and common mistakes
- Wrapping up and next steps
What you need
- ● Limestone: 10–20 cubic feet (depending on bed size and thickness; opt for tumbled or rough-sawn edges for texture).
- ● Landscape fabric: 1 roll (to suppress weeds and retain moisture).
- ● Gravel or crushed stone: 2–3 bags (½"–1" size for drainage and base layer).
- ● Soil: 2–3 cubic feet of high-quality garden soil or a mix of topsoil and compost (for planting).
- ● Shovel and spade: 1 each (for digging and shaping).
- ● Wheelbarrow: 1 (for hauling materials).
- ● Level and measuring tape: 1 each (to ensure precision).
- ● Rubber mallet or sledgehammer: 1 (for settling stones).
- ● Gloves and safety goggles: 1 pair each (protection is key!).
- ● Edging materials: Flexible metal, plastic, or natural stone (to define the bed’s shape).
- ● Moss or ground cover plants: For a lush, low-maintenance look.
- ● Outdoor-safe sealant: To enhance limestone’s natural color and durability.
- ● Solar-powered landscape lights: To highlight your bed after dark.
- ● Decorative accents: Pebbles, mulch, or small statues for added flair.
Step-by-Step instructions for building a limestone garden bed
Transform your yard with a timeless limestone bed that adds texture and charm to any outdoor space.
🪴 Step 1: Mark and Excavate the Bed Layout
Use a garden hose or spray paint to outline your bed shape on the ground. I like to sketch the design first—limestone beds look best with clean lines or organic curves. For a 4-foot-wide bed (standard for easy maintenance), mark the edges with stakes and string. Dig out the marked area to a depth of 6-8 inches, removing sod and topsoil.
Keep the excavated soil for later—you’ll need it to backfill around the edges. If your area has rocky subsoil, break it up with a pick or shovel to create a stable base. The key here is leveling: use a 4-foot level to check that the bottom of your trench is even. Uneven beds cause drainage issues and make planting difficult later.
🪴 Step 2: Install the Base Layer and Edging
Lay a 4-inch layer of crushed limestone along the bottom of the trench. This isn’t just for drainage—it prevents weeds from creeping up through the bed. Use a rake to spread it evenly, then tamp it down lightly with a plate compactor or the back of a shovel. For the edging, stack limestone slabs (cut to size if needed) along the marked perimeter, leaving 2-3 inches of space between each stone for stability.
Here’s the thing—limestone edging should be slightly taller than the finished bed height. I usually build it 8-12 inches high so it contains soil and plants while looking natural. Secure the stones with landscape adhesive or by backfilling the trench with the excavated soil, pressing firmly around each slab. This keeps them from shifting over time.
🌱 Step 3: Build the Stone Layers for Texture
Start filling the bed with a 3-inch layer of coarse limestone gravel—this is your drainage layer. It keeps roots from sitting in soggy soil while adding that signature rustic look. Next, add a 2-inch layer of topsoil mixed with compost (I use about 1 part compost to 3 parts soil). This gives plants the nutrients they need without overwhelming the stone aesthetic.
Now for the star of the show: arrange flat limestone slabs across the bed in a staggered pattern. Leave 1-2 inches of space between stones to allow water to drain and plants to peek through. For a more organic look, mix in smaller stones and pebbles in the gaps. This creates pockets for shallow-rooted plants like thyme or creeping phlox while keeping the bed’s natural charm.
💧 Step 4: Plant and Mulch for Long-Term Beauty
Choose plants that thrive in well-draining soil—drought-tolerant succulents, ornamental grasses, and low-growing perennials work beautifully. Dig small holes in the soil pockets between stones, place plants gently, and cover roots with soil. Water deeply right after planting to settle everything in. For a 4-foot bed, I typically use 8-12 plants spaced 12-18 inches apart for a lush, full look.
Top off the bed with a 1-inch layer of fine limestone mulch. This isn’t just decorative—it suppresses weeds, retains moisture, and blends seamlessly with the stones. Avoid organic mulches like wood chips, as they can alter the soil’s pH over time. Instead, stick with limestone to maintain that cohesive, natural stone garden vibe.
✂️ Step 5: Maintain and Refresh Over Time
Limestone beds are low-maintenance, but they do need occasional care. Check the bed after heavy rains—if water pools on top, add more coarse gravel to improve drainage. Once a year, top off the mulch layer to keep it looking fresh. Weeds might pop up in the soil pockets, so pull them early before they spread between the stones.
Every 2-3 years, refresh the bed by adding a 1-inch layer of compost to the soil pockets. This keeps nutrients up without disrupting the stone layout. If any stones shift over time, tuck them back into place with a gentle tap from a rubber mallet. With this approach, your limestone garden bed will stay stunning for decades—minimal effort, maximum impact.
Tips & tricks for perfect limestone garden beds
A few simple strategies will help you create a limestone garden bed that looks stunning and lasts for years. The key is in the details—leveling, layering, and plant selection make all the difference.
Leveling is Everything: In Step 1, don't rush the leveling process. Use a 4-foot level to check the bottom of your trench in multiple spots—front to back and side to side. Uneven beds create drainage problems and make planting difficult later. I've learned the hard way that taking 10 extra minutes to level properly saves hours of frustration down the road.
Stone Selection Matters: For Step 2, choose limestone slabs that are similar in color and texture. Mixing different shades can create visual chaos. If you're working with irregular stones, arrange them with the roughest sides down and smoother sides up for a more polished look. The 2-3 inch spacing between edging stones is crucial—it allows for expansion and prevents cracking over time.
Drainage Layer Tip: In Step 3, that 3-inch layer of coarse limestone gravel isn't just for looks—it's your bed's circulatory system. If your area gets heavy rainfall, consider adding an extra inch of gravel, especially if you're planting succulents that hate soggy roots. The gravel should be slightly larger than pebbles to prevent clogging between the stones.
Plant Spacing Strategy: When placing your 8-12 plants in a 4-foot bed (Step 4), think about how they'll grow. Place taller plants toward the back and shorter ones toward the front, leaving 12-18 inches between them. This spacing gives roots room to spread while preventing overcrowding. I always make my holes slightly larger than the root ball to encourage good root growth.
Pro Tips for Limestone Garden Bed
- A few simple strategies will help you create a limestone garden bed that looks stunning and lasts for years.
- Leveling is Everything: In Step 1, don't rush the leveling process.
- Stone Selection Matters: For Step 2, choose limestone slabs that are similar in color and texture.
Frequently asked questions
Got questions about creating or maintaining a limestone garden bed? You’re not alone! Here are answers to the most common queries to help you craft a stunning, low-maintenance outdoor space with confidence.
What’s the best time of year to install a limestone garden bed?
Spring or early fall are ideal! Temperatures are mild, making it easier for plants to establish roots before extreme heat or cold. Avoid winter (frost can damage limestone) and peak summer (drought stress). If you’re in a warm climate, late fall works too—just ensure plants are drought-tolerant.
Do I need a special base layer under the limestone?
A compacted gravel base (2–3 inches) is critical for drainage and stability. Skip this step, and water pooling or shifting stones could become a problem. Use crushed limestone or coarse sand—it’s budget-friendly and blends seamlessly with your design.
Can I use limestone for edible gardens (like veggies or herbs)?
Yes, but with caution! While limestone is non-toxic, it’s alkaline and can alter soil pH over time. Test your soil first—if it’s already alkaline, pair limestone with organic matter (compost) to balance it. Acid-loving plants (like blueberries) may struggle; opt for limestone-friendly herbs (rosemary, thyme) or veggies (kale, Swiss chard).
How often should I water a limestone garden bed?
Less often than you think! Limestone’s porous nature allows water to drain quickly, reducing evaporation. Water deeply 2–3 times per week in dry spells, then taper off once plants are established. Mulch (2–3 inches) helps retain moisture. Overwatering is the biggest mistake—limestone hates soggy roots!
What if my limestone starts cracking or shifting over time?
Don’t panic—it’s normal! Minor cracks are harmless, but large gaps or sinking stones signal drainage issues. Rake back soil, level the bed, and add a thin layer of fresh gravel. For persistent shifts, reinforce edges with landscape fabric or larger, interlocking stones. Regularly check for weeds growing between stones—they can destabilize the bed over time.
Are there cheaper alternatives to limestone for garden beds?
Yes! Consider:
- Fieldstone: Irregular shapes add rustic charm at lower costs.
- Concrete pavers: Durable and customizable (but less natural).
- Recycled brick: Eco-friendly and budget-friendly.
- Wood chips/mulch: Great for temporary or low-maintenance beds.
Wrapping up and next steps
Creating a limestone garden bed brings timeless charm and natural beauty to your outdoor space—without the fuss! Whether you’re drawn to its rustic elegance, durability, or low-maintenance appeal, this project is a rewarding way to elevate your landscaping.
The key? Plan ahead, prep carefully, and let the stone’s organic texture shine.
Ready to transform your yard? Start small with a single bed or go bold with a full pathway—either way, your green thumb (and your guests!) will love the results. Grab your tools, gather your stones, and get building! 🌿✨