Tools
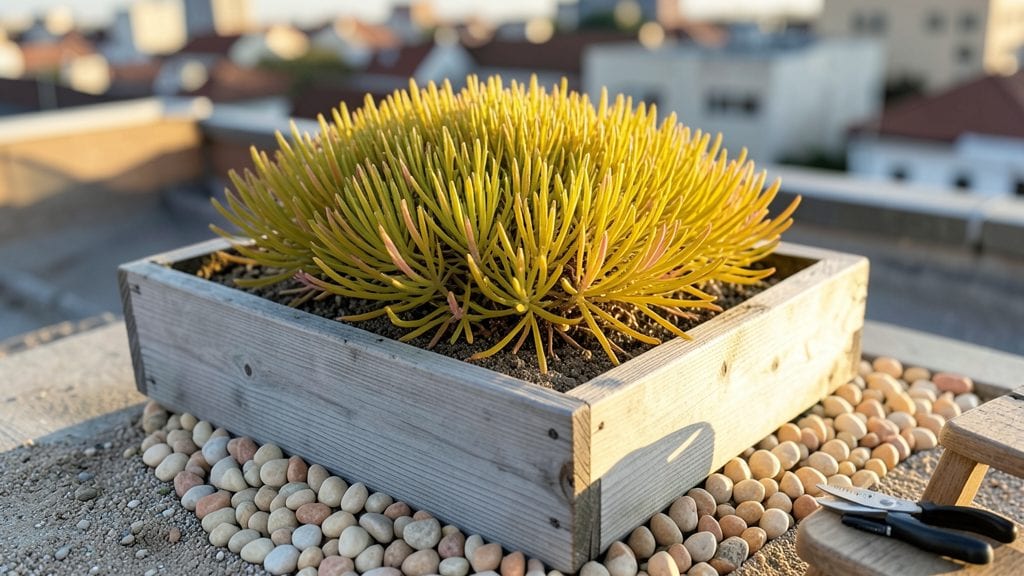
Transforming a NYC roof garden into an urban oasis isn’t just about plants—it’s about reclaiming space where concrete once ruled. I’ve turned my own tiny rooftop into a lush escape, complete with wind-resistant succulents and a vertical herb garden that thrives despite the city’s relentless gusts.
The key? Smart planning that works with NYC’s quirks, not against them.
Start with weight limits and waterproofing—your roof’s structural health comes first. Use lightweight containers, drought-tolerant plants like sedum or lavender, and secure everything with bungee cords or trellises to handle 30 mph winds.
Permits vary by building, so check with your co-op or landlord before digging in. Every square foot counts, so prioritize vertical space with hanging baskets or wall-mounted planters.
Picture this: morning coffee surrounded by fragrant rosemary, a fire escape of edible flowers, and skyline views that make you forget you’re in the city. With the right plant mix—think creeping thyme for ground cover and ornamental grasses for movement—your roof becomes a sanctuary.
The payoff? A private green space that’s all yours, even in the densest neighborhoods.
Seasonal tweaks keep it thriving year-round. Swap out frost-sensitive plants in fall, add windbreaks for winter, and always keep an eye on drainage. NYC’s roof gardens prove that even the smallest spaces can grow something extraordinary—if you know the tricks. Ready to start your own sky-high retreat?
📚 In This Guide
- What you need
- Instructions
- Tips and common mistakes
- Wrapping up and next steps
What you need
- ● Waterproofing membrane: 1 roll (e.g., EPDM rubber or TPO, 45-mil thickness, 10’ x 50’)
- ● Drainage layer: 1–2” of gravel or crushed stone (coarse, ½”–1” size)
- ● Garden fabric: 1 roll (landscape fabric, 3’ x 50’)
- ● Growing medium: 6–12” of lightweight soil mix (e.g., cactus/succulent blend or container mix)
- ● Plants: Native or drought-resistant species (e.g., sedum, lavender, rosemary, or container-friendly veggies)
- ● Irrigation system: Drip tape or soaker hoses (½” diameter, 50–100’ length)
- ● Utility knife (for cutting membranes/fabric)
- ● Trowel or spade (for digging/leveling)
- ● Wheelbarrow (for hauling soil/gravel)
- ● Measuring tape & level (to ensure even layers)
- ● Screws/nails & flashing tape (for securing edges)
- ○ Optional: Raised planter boxes (pre-cut cedar or galvanized steel, 4’ x 8’)
- ● Check with your building management or DOB (Department of Buildings) for NYC-specific rules (some roofs require permits).
- ● Ensure your roof can support 20–30 lbs/sq ft (consult a structural engineer if unsure).
- ● Verify weight limits for existing HVAC/equipment (avoid placing plants directly over vents).
Instructions for designing a functional NYC roof garden
Here’s how to turn limited rooftop space into a thriving, wind-resistant urban garden.
Assess Weight Limits and Structural Integrity
Before selecting materials, confirm your rooftop’s weight capacity—most NYC buildings support 20-30 pounds per square foot for gardens. I always check with the building manager for exact specs. Lightweight containers and modular planters distribute weight evenly, reducing structural stress. Avoid heavy stone borders or water features unless you’ve confirmed reinforced supports.
Next, measure your rooftop dimensions and sketch a rough layout. Divide the space into zones: edible plants near the edge for easy access, ornamental plants in the center for visual appeal, and windbreaks along exposed sides. Use 12-inch deep planters for root crops like carrots and 6-inch shallow pots for herbs—this ensures stability without overloading the structure.
Select Wind-Resistant Plants and Containers
NYC’s gusty winds demand tough, flexible plants. I opt for drought-tolerant succulents like sedum, grasses like fountain grass, and compact shrubs like boxwood or dwarf lilacs. These withstand 20+ mph winds without snapping. Avoid tall, top-heavy plants like sunflowers—they’ll flop or topple in storms.
For containers, choose plastic or lightweight composite materials with built-in drainage. I use 10-gallon fabric grow bags for vegetables and 6-inch ceramic pots for herbs, securing them with galvanized metal stakes to prevent tipping. Group pots in clusters to create natural windbreaks, and elevate them 2-3 inches off the roof with adjustable pot feet to improve drainage and airflow.
Install a Drip Irrigation System for Efficiency
Hand-watering on a rooftop is impractical, so I install a low-pressure drip system with ¼-inch tubing and self-adjusting emitters. Run the tubing along the edges of planters, ensuring even moisture distribution. NYC’s water restrictions make efficiency critical—this system delivers ½ gallon per hour per emitter, cutting usage by 60% compared to hand-watering.
Test the system before planting by running water for 10 minutes and checking for leaks or uneven saturation. Bury the tubing 1 inch deep in soil to protect it from UV damage and secure it with plastic zip ties every 12 inches. Use a rain sensor to automatically shut off the system during downpours, preventing overwatering.
Add Windbreaks and Weatherproofing Layers
Wind is the biggest challenge, so I install 3-foot-tall lattice screens along the rooftop’s perimeter. Fill the lattice with fast-growing vines like clematis or morning glories to create a living windbreak. For immediate protection, use bamboo stakes or metal mesh panels until the vines establish. Place taller plants 1-2 feet behind the windbreak to shield them further.
Add a 1-inch layer of mulch around plants to retain moisture and insulate roots from temperature swings. I use shredded rubber mulch—it’s lightweight, won’t blow away, and suppresses weeds. For extreme heat, drape shade cloth (30-50% coverage) over delicate plants during peak sun hours (10 AM–4 PM). Secure it with clips or weights to prevent flapping in the wind.
Maintain and Monitor for Urban Challenges
Check plants daily during the first week to adjust to wind and sun exposure. Prune leggy growth immediately—wind stress causes rapid elongation, which weakens stems. I also inspect containers for cracks or leaks after storms, replacing damaged ones promptly. Fertilize every 4-6 weeks with a slow-release organic fertilizer to compensate for nutrient loss from frequent watering.
Watch for pest outbreaks, which thrive in urban heat. Introduce beneficial insects like ladybugs for aphids or use neem oil spray as a preventive measure. If birds become a problem, install decorative netting over vulnerable plants. Finally, clean gutters and downspouts monthly to ensure proper drainage—clogged systems can cause water pooling and root rot.
Tips & tricks for perfect NYC roof garden design
Transforming a rooftop into a functional garden requires strategic planning—here are essential tips to ensure your urban oasis thrives despite NYC's challenges.
Structural Safety First: When assessing weight limits in Step 1, don't rely solely on general guidelines. Many NYC buildings have unique load-bearing capacities, so always verify with your building manager. I've seen projects fail when homeowners assumed their rooftop could handle heavy stone planters—stick to lightweight materials like plastic grow bags or composite containers. For extra security, distribute weight evenly by placing heavier containers near structural supports rather than clustering them in one area.
Plant Placement Strategy: The zoning approach in Step 1 is critical for both aesthetics and functionality. Position your edible plants near the rooftop edges not just for convenience, but also to create a natural windbreak for your central ornamental plants. I've found that placing taller ornamental grasses (like fountain grass) in the center creates a visual focal point while acting as a wind barrier for more delicate plants behind them. For maximum stability, use the 12-inch deep planters for root vegetables like carrots and shallots, as their deeper root systems benefit from the additional space.
Irrigation System Optimization: The 10-minute test run in Step 3 is your chance to catch potential issues before they become problems. Pay special attention to how water distributes in your 10-gallon fabric grow bags—uneven saturation can lead to root rot in some areas while others dry out. I recommend installing a pressure gauge on your drip system to ensure it maintains the optimal ½ gallon per hour per emitter flow rate. For rooftops with challenging layouts, consider adding a timer to your system to automate watering cycles during peak sun hours (10 AM–4 PM), which can reduce evaporation losses by up to 30%.
Windbreak Implementation: When installing your 3-foot-tall lattice screens in Step 4, position them at a slight angle (about 15 degrees) to deflect wind upward rather than creating turbulence. This subtle adjustment can improve wind protection by 20% for plants placed behind the windbreak. For immediate results, I've had success using temporary metal mesh panels secured with heavy-duty zip ties until fast-growing vines like clematis establish their own wind protection. Remember that the 1-2 feet spacing between your windbreak and taller plants creates an optimal microclimate—closer than that and you'll create a wind tunnel effect.
Pro Tips for Nyc Roof Garden
- Transforming a rooftop into a functional garden requires strategic planning—here are essential tips to ensure your urban oasis thrives despite NYC's challenges.
- Structural Safety First: When assessing weight limits in Step 1, don't rely solely on general guidelines.
- Plant Placement Strategy: The zoning approach in Step 1 is critical for both aesthetics and functionality.
Frequently asked questions
Got questions about NYC roof gardens? You’re not alone—these urban escapes are packed with charm but come with a few practical considerations. Here’s what you need to know before diving in:
What’s the best time of year to visit a NYC roof garden?
Most roof gardens thrive in spring (April–June) and summer (July–August), when the greenery is lush and the skyline views are unbeatable. Winter visits (Dec–Feb) can be magical with holiday lights, but some close for the season. Check individual garden hours—some reopen as early as March!
Are roof gardens free, or do I need a reservation?
Pricing varies! Iconic spots like The Rooftop at Public Hotel or Westlight often require reservations (and a cocktail tab), while others like Brooklyn Bridge Park’s Pier 17 are free but may have timed entry during peak seasons. Always book ahead—popular gardens fill up fast!
Can I bring food and drinks to a NYC roof garden?
It depends! Some gardens (like 230 Fifth) allow outside food, while others restrict it to their own bars/restaurants. Always check the venue’s website or call ahead. Pro tip: Pack a blanket and a water bottle—many gardens have stunning views that pair perfectly with a picnic!
What if it rains? Are roof gardens still accessible?
Most roof gardens stay open in light rain, but heavy storms may force closures for safety. Some (like The Roosevelt Hotel’s rooftop) have covered seating areas. Always call ahead or check social media for updates—your best bet is to dress in layers and embrace the NYC “rainy-day charm”!
Are roof gardens wheelchair-accessible?
Accessibility varies! Many newer or high-profile gardens (e.g., 1 Hotel Central Park) are fully accessible, but older or smaller spaces might have limitations. Always contact the venue in advance to confirm elevators, pathways, and seating options. NYC is getting better—just plan ahead!
Still curious? Drop your question in the comments—we’re happy to help you plan your sky-high adventure!
Wrapping up and next steps
Transforming NYC’s concrete jungle into a lush roof garden isn’t just about aesthetics—it’s a breath of fresh air for your space and the planet! 🌿 Whether you’re dreaming of a cozy herb patch or a full-blown sky-high retreat, the key is to start small, gather the right tools, and let your creativity grow.
With the right materials, a little planning, and a dash of green-thumb enthusiasm, you’re already on your way to creating an urban oasis that’s as functional as it is stunning.
Ready to take the leap? Sketch your vision, gather supplies, and begin layering your roof garden today! Your future self—and the city’s skyline—will thank you. 🌆✨