Tools
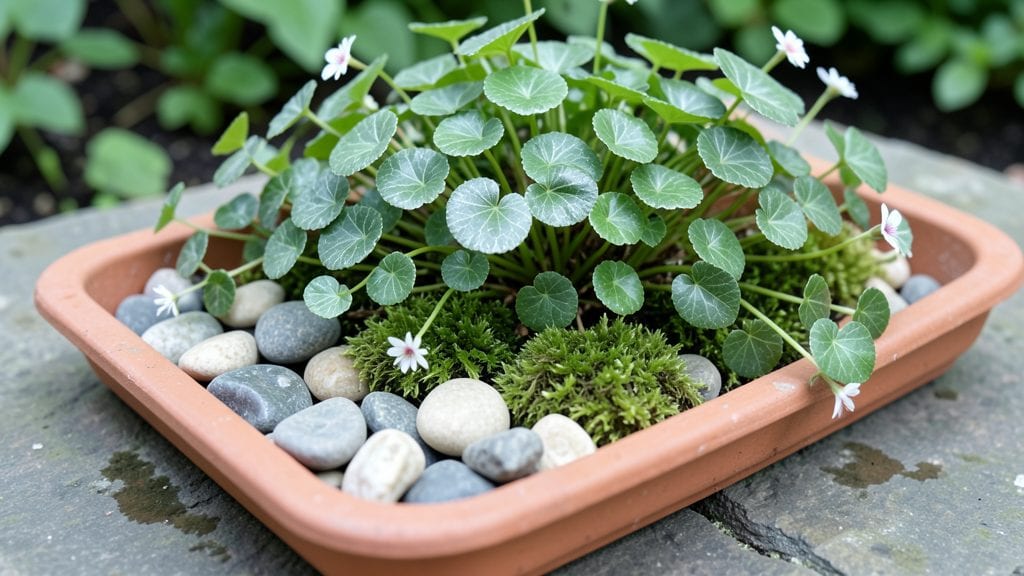
A fairy rock garden transforms a corner of your yard into a miniature enchanted world where moss carpets the ground and tiny toadstools peek from behind smooth river stones.
I stumbled upon this idea after watching my kids lose themselves in a pile of rocks and sticks—turns out, you don’t need a big space, just a few key elements to spark that same wonder.
The magic lies in the details: weathered pebbles, delicate ferns, and maybe a tiny bridge or two to invite fairies (or curious humans) to explore.
You’ll need basic supplies: smooth stones in varying sizes, some shade-tolerant plants like creeping thyme or miniature hostas, and a few decorative touches like moss, tiny figurines, or even painted rocks.
The setup takes just a weekend, and the low-maintenance design means you’ll spend more time admiring it than tending to it. It’s the kind of project that looks effortless once you see it—but the secret is in the layering: texture, height, and hidden nooks where "fairy doors" might appear.
By the time you’re done, you’ll have a secret garden that feels like a step into another world—one that doubles as a conversation starter with neighbors.
The soft green of moss contrasts beautifully with the muted tones of rocks, while the play of light through tiny plants creates a dappled, dreamy effect. Kids will beg to "help" with the decorating, and even adults can’t resist reaching out to touch the delicate leaves.
Whether you’re working with a small balcony planter or a sprawling backyard corner, the principles stay the same: keep it natural, add whimsy, and let the imagination run wild. Next time someone asks what makes your garden special, you’ll have a story—and a hidden world—to share.
📚 In This Guide
- What you need
- Instructions
- Tips and common mistakes
- Wrapping up and next steps
What you need
- ● Rocks & Stones: A mix of smooth river rocks (8–12 inches in diameter, 10–15 pieces), flat slate stones (6–8 pieces), and decorative garden rocks (varied sizes, 20+ pieces). Opt for natural, weather-resistant stones.
- ● Soil & Mulch: Well-draining potting mix (2–3 bags, 1–2 cubic feet each) and organic mulch (1 bag, 2–3 cubic feet) to retain moisture and suppress weeds.
- ● Plants: Moss (sheet moss or peat moss, 1–2 small rolls), succulents (3–5 tiny varieties like sedum or echeveria), and ferns or tiny ferns (2–3 plants). Avoid anything over 6 inches tall!
- ● Fairy Garden Accents: Miniature figurines (fairies, gnomes, mushrooms, or tiny bridges—5–10 pieces).
- ● Decorative twigs or driftwood (3–5 pieces, 6–12 inches long).
- ● Pebbles or sand (1 small bag of colored gravel or fine sand for pathways).
- ○ Gardening Tools: Small hand trowel, pruning shears, spray bottle (for misting plants), and gloves (optional but handy!).
- ○ Optional Enhancements: Solar-powered fairy lights (battery-operated, tiny string lights for ambiance).
- ● Paint or sealant (non-toxic, for customizing rocks—e.g., acrylic paint or stone sealant).
- ● Miniature furniture (tiny benches, teacups, or lanterns for extra charm).
- ● A sunny or partially shaded spot (6+ hours of light for succulents, dappled shade for moss).
- ● A container or in-ground space (12–24 inches deep, with drainage holes if potted).
- ● Patience & creativity! Fairy gardens thrive on imagination—no two are exactly alike. 🎨
Step-by-Step instructions for creating a fairy rock garden
Bring your outdoor space to life with a charming fairy rock garden that feels magical yet simple to build.
Choose and Prepare Your Location
Pick a spot that gets partial shade—fairy gardens thrive where direct sun doesn’t bake the moss or dry out delicate plants. A shallow depression or natural dip in the ground works best, as it creates a cozy, hidden world. Clear away any grass, weeds, or debris from the area, then mark the outline with a garden hose or string to visualize the space.
For a whimsical touch, consider placing your garden near a tree, under a bench, or along a garden path where it can be easily admired. The key is to create a sense of enclosure, so if your space is open, use larger rocks or low shrubs to frame the edges. Test the area by kneeling in it—you’ll want to be comfortable working there for hours.
Layer the Base for Stability and Drainage
Start with a 2-inch layer of coarse sand to ensure proper drainage—fairy gardens hate soggy roots. Spread it evenly over the entire area, then tamp it down lightly with your hands or a small board. Next, add a 3-inch layer of small gravel or decomposed granite to create a sturdy foundation that won’t compact over time.
Press down firmly to eliminate air pockets, then top with a 1-inch layer of fine gravel or small pebbles. This middle layer prevents weeds from pushing through while allowing water to drain freely. Avoid using soil at this stage—it’ll settle unevenly and create an unstable base for your rocks and plants.
Build the Rock Framework
Arrange your largest rocks first to form the backbone of the garden. Place them in a way that creates natural-looking pathways, seating areas, or even tiny bridges. Use a mix of flat stones for tables, rounded boulders for seating, and smaller rocks to fill gaps. Leave some spaces open for planting—fairy gardens feel most magical when they’re slightly uneven and organic.
Test the stability of each rock by gently tapping it into place. If a stone feels wobbly, add a small amount of pebbles underneath to secure it. Avoid overcrowding—fairy gardens should feel airy and inviting, not cluttered. Step back occasionally to check the overall balance and flow of the design.
Add Soil and Plant Your Fairy Garden
Fill the gaps between rocks with a 2-inch layer of well-draining potting mix, mixing in a handful of perlite or sand if your soil tends to stay damp. Press it lightly into place, then plant small succulents, moss, or tiny flowering plants like miniature roses or creeping thyme. These plants thrive in shallow soil and add texture and color to your scene.
Leave some bare soil visible—it creates the illusion of a natural, undisturbed landscape. Water gently but thoroughly after planting to settle the soil without displacing rocks. Avoid overwatering, as fairy gardens are delicate and prone to rot if soggy. A light misting every few days keeps them lush without overwhelming the space.
Add Whimsical Touches and Final Details
Now for the fun part—personalize your garden with tiny decorations like miniature mushrooms, pebble paths, or even a tiny fairy door. Use small pebbles or sand to create winding trails, or arrange moss in soft, flowing drifts. Add a few larger stones as "benches" or "tables" to complete the scene. The goal is to make it feel like a tiny, lived-in world.
Step back and adjust any elements that feel out of place. Fairy gardens should feel intentional but natural, as if they’ve been there for years. Once everything looks balanced, give it a final watering and let the magic unfold. Over time, the plants will fill in, and the garden will feel even more enchanting.
Tips & tricks for perfect fairy rock gardens
Creating a fairy rock garden is all about balancing creativity with practicality—here's how to elevate your design while keeping it simple and enchanting.
Location is Everything: When selecting your partial shade spot in Step 1, consider how the garden will be viewed. Position it where you'll naturally pause to admire it, like near a walking path or seating area. I always kneel to test the space—this helps me visualize the scale and ensures I won't be uncomfortable arranging elements. The magic happens when the garden feels like a natural part of your landscape rather than an afterthought.
Layering Secrets for Stability: In Step 2, don't skip the coarse sand layer—it's the foundation that prevents your entire creation from becoming a soggy mess. I've learned this the hard way after watching rocks sink into muddy soil. For the 3-inch gravel layer, use a tamper or even a flat-bottomed pot to press it down firmly. This creates a solid platform where your rocks will stay put. The 1-inch fine gravel top layer is often overlooked but prevents weeds from pushing through while maintaining drainage.
Rock Arrangement Technique: When building your rock framework in Step 3, think about creating visual pathways that guide the eye through your garden. Place your largest rocks first to establish the main features, then fill in with smaller stones to create texture. I like to arrange rocks in odd numbers (3, 5, or 7) for a more natural look. Leave some intentional gaps—they create spaces for plants to grow and add to the whimsical feel. Remember, fairy gardens should feel slightly imperfect, as if they've been there for centuries.
Planting with Purpose: When adding your 2-inch layer of well-draining potting mix in Step 4, mix in a handful of perlite or sand if your area gets heavy rainfall. This prevents waterlogging that can rot delicate plants. I always plant moss last—it's the finishing touch that ties everything together. For watering, use a spray bottle for the final misting in Step 5. This gives you precise control and prevents disturbing your carefully arranged rocks.
Pro Tips for Fairy Rock Garden
- Creating a fairy rock garden is all about balancing creativity with practicality—here's how to elevate your design while keeping it simple and enchanting.
- Location is Everything: When selecting your partial shade spot in Step 1, consider how the garden will be viewed.
- Layering Secrets for Stability: In Step 2, don't skip the coarse sand layer—it's the foundation that prevents your entire creation from becoming a soggy mess.
Frequently asked questions
What’s the best time of year to plant a fairy rock garden?
For year-round enjoyment, plant in early spring or fall when temperatures are mild. This gives plants time to establish roots before extreme heat or cold. If you’re in a warm climate, avoid summer planting—succulents and mosses may struggle with drought stress. Pro tip: Check your local frost dates to time it perfectly!
How much does a fairy rock garden cost to build?
Costs vary widely! A small DIY project (1–2 sq ft) can run $20–$50 using thrifted rocks, potting soil, and free plants (like moss or clover). Larger or professionally designed gardens may cost $100–$500+, depending on materials like slate, pebbles, or custom figurines. Save money by foraging rocks and using recycled containers!
Will bugs or pests ruin my fairy rock garden?
Not necessarily! Moss, succulents, and hardy ground covers naturally deter pests. However, slugs or snails might nibble on tender plants. Prevent issues by:
- Adding diatomaceous earth (food-grade) around edges.
- Choosing drought-resistant plants like sedum or hen-and-chicks.
- Placing copper tape (a slug barrier) at the base.
How do I keep my fairy rock garden from washing away in rain?
Erosion is the #1 enemy of fairy gardens! Secure your setup with these tricks:
- Use larger rocks as anchors (place them first).
- Layer gravel or coarse sand under soil for drainage.
- Add plastic edging or bendable wire to contain soil.
- Plant creeping thyme or clover—their roots hold soil in place!
Can I make a fairy rock garden in a container or hanging planter?
Absolutely!
Containers are perfect for fairy gardens—just choose one with drainage holes and depth (at least 6 inches). Hanging baskets work too, but opt for lightweight materials like:
- Moss (holds moisture well).
- Mini succulents (thrive in small spaces).
- Air plants (zero soil needed!).
Wrapping up and next steps
Creating a fairy rock garden is more than just a landscaping project—it’s a chance to infuse your outdoor space with magic, creativity, and charm. Whether you’re a seasoned gardener or a beginner, this whimsical project transforms ordinary rocks into a focal point that delights both you and passersby. 🌟
Now that you’re armed with the right materials and answers to common questions, it’s time to roll up your sleeves and bring your vision to life! Start small—pick a corner of your yard, balcony, or even a windowsill—and let your imagination guide the way. Your enchanted garden awaits!
Next step: Gather your tools, sketch a simple design, and dive into the fun! 🛠️✨