
Tools
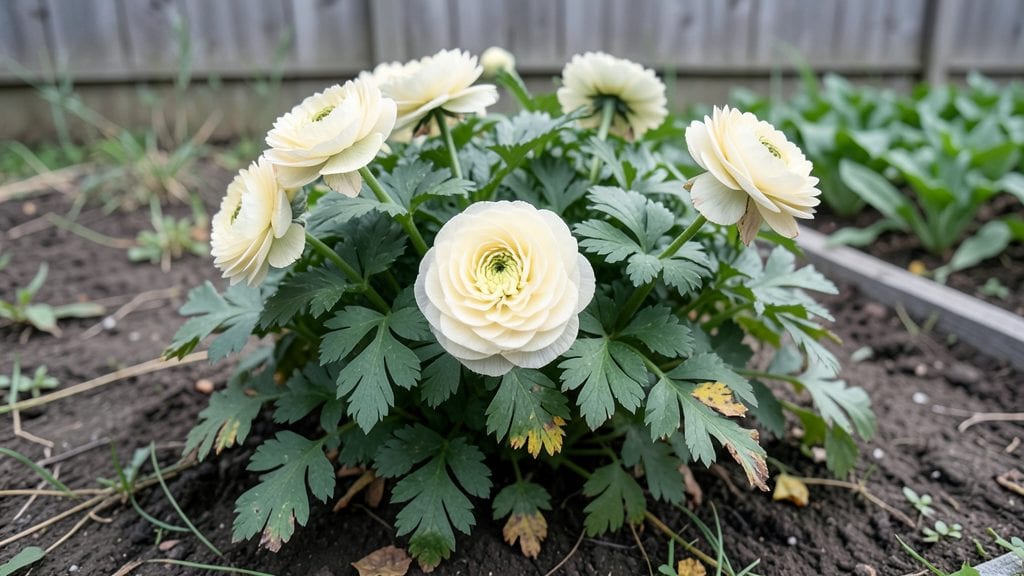
My garden’s boldest statement comes from ranunculus flowers—those layered, papery blooms that look like they’ve been painted by hand. 🌸 They’re the secret weapon for turning ordinary borders into showstoppers, and once you see them in person, you’ll never want to plant without them again.
Here’s the thing—ranunculus thrive in clusters, so they’re perfect for cottage garden vibes or structured floral borders. Pair them with lavender for a soft purple contrast, or let them steal the show in containers alongside trailing sweet alyssum.
Their long stems make them ideal for cutting too, so you’ll always have fresh bouquets without sacrificing the garden’s beauty.
You’ll end up with a garden that feels like a living painting—vibrant, textured, and full of movement. The blooms last for weeks, and their layered petals catch the light in ways no other flower does. Plus, they’re surprisingly low-maintenance once established, so you get drama with minimal effort.
Whether you’re going for a whimsical cottage look or a sleek modern border, ranunculus adapt effortlessly. They’re the kind of plant that makes neighbors stop and ask, “What are those?”—and then you get to brag about your secret weapon. Let’s make your garden unforgettable.
📚 In This Guide
- What you need
- Instructions
- Tips and common mistakes
- Wrapping up and next steps
What you need
- ● Ranunculus bulbs or seeds: Choose Ranunculus asiaticus (hardy bulbs) or Ranunculus acris (wildflower seeds). For a bold display, opt for 10–20 bulbs per square foot (or 1–2 lbs of seeds for wildflower mixes).
- ● Well-draining soil: Amend heavy clay with compost or perlite (50% soil, 50% amendment) to prevent rot.
- ● Fertilizer: A balanced 10-10-10 or phosphorus-rich (5-10-10) fertilizer to encourage blooms.
- ● Mulch: 1–2 inches of straw or pine bark to retain moisture and regulate soil temp.
- ● Garden trowel or bulb planter (for precise planting).
- ● Hand fork or garden fork (to loosen soil before planting).
- ● Watering can or hose with a gentle spray nozzle (avoid oversaturating bulbs).
- ○ Gloves (optional but recommended for handling soil/bulbs).
- ○ Stakes or cages (optional, for tall varieties like Ranunculus ‘Butterfly’).
- ● Sunlight: Full sun (6+ hours/day) for vibrant blooms.
- ● Climate: Plant bulbs in fall (8–10 weeks before last frost) for spring blooms. Seeds can be sown in early spring or fall.
- ● Spacing: Plant bulbs 3–4 inches apart (closer for wildflower seeds).
Step-by-Step guide to planting ranunculus for stunning year-round blooms
Here's my foolproof method for growing these showstopping flowers that keep coming back with minimal effort.
🌱 Step 1: Choose the Perfect Planting Location
Ranunculus thrives in full sun—at least 6 hours daily. I always pick a spot with morning sunlight and afternoon shade in hotter climates, which prevents the blooms from scorching. The soil should drain well; these flowers hate soggy roots, so avoid low-lying areas where water pools.
Test your spot by digging a 6-inch deep hole. If water doesn't drain within 30 minutes, amend the soil with 1-2 inches of coarse sand or perlite mixed into the top 12 inches. The ideal soil is loose, airy, and slightly alkaline (pH 6.5-7.5). You'll know you've got it right when the soil crumbles easily between your fingers.
🪴 Step 2: Prepare the Soil for Healthy Growth
Work in 2-3 inches of well-aged compost or a balanced 10-10-10 fertilizer into the top 12 inches of soil. I like to mix this in a few weeks before planting to let it settle naturally. Avoid fresh manure—it can burn tender ranunculus roots and stunt growth.
Loosen the soil to a depth of 12 inches with a garden fork or tiller. Break up any compacted layers so roots can penetrate easily. If your soil is heavy clay, add 1 part perlite or coarse sand to 3 parts soil to improve drainage. The goal is soil that feels like a damp sponge—not sticky or powdery.
🌿 Step 3: Plant Ranunculus Corms Correctly for Best Results
Ranunculus grows from corms, not seeds. Plant them 2-3 inches deep in the soil, with the pointed end facing up. Space corms 3-4 inches apart in rows 6-8 inches apart for a lush, continuous display. I plant mine in early spring, about 2-3 weeks before the last frost date in my zone.
Gently firm the soil around the corms but don't compact it—you want air pockets for root development. Water lightly after planting to settle the soil, but avoid soaking it. The corms need time to establish roots before heavy watering. You'll see the first shoots emerge in 4-6 weeks, and that's your signal everything is on track.
☀️ Step 4: Maintain Water and Light for Continuous Blooms
Once shoots appear, water 1 inch per week, keeping the soil consistently moist but never soggy. I check moisture by sticking my finger 1 inch deep—if it feels dry, it's time to water. Mulch around plants with 1-2 inches of straw or shredded leaves to retain moisture and suppress weeds, but keep mulch 2 inches away from stems to prevent rot.
Deadhead spent blooms by snipping stems ½ inch above the base to encourage more flowers. I do this every 2-3 days during peak bloom. Fertilize lightly every 4-6 weeks with a balanced fertilizer (like 10-10-10) to keep blooms vibrant. Ranunculus is drought-tolerant once established, but consistent care rewards you with year-after-year blooms.
✂️ Step 5: Winter Care for Next Season's Blooms
In fall, after the first hard frost blackens the foliage, cut back stems to 1 inch above the soil. The corms will remain dormant underground. Add 2-3 inches of mulch around the planting area to protect corms from freezing. I use straw because it insulates well and breaks down slowly.
In early spring, remove the mulch and water lightly to wake up the corms. You'll see new growth in 3-4 weeks. This annual cycle ensures your ranunculus comes back bigger and more beautiful each year. With proper care, these flowers will reward you with bold color and effortless beauty for seasons to come.
Tips & tricks for perfect ranunculus planting
These simple strategies will help you avoid common mistakes and get the most vibrant blooms from your ranunculus.
The Sunlight Secret: While ranunculus needs that full sun, I've learned the hard way that afternoon shade in hot climates makes all the difference. The 6 hours of daily sun should be morning sun when possible—it prevents the delicate blooms from wilting under intense afternoon heat. If you're in a very hot zone, consider a spot with morning sun and afternoon dappled shade from nearby trees.
Soil Test Trick: That 30-minute drainage test in Step 1 is crucial—don't skip it! I've planted in spots that seemed fine until the first heavy rain, when water pooled and caused rot. For heavy clay soils, mix in 1 part perlite to 3 parts soil—this creates the perfect airy texture without over-amending. Think of it like making a fluffy cake batter rather than dense mud.
Timing Tip for Corms: The 4-6 week window for first shoots in Step 3 can feel like forever, but patience pays off! If you're eager to see progress, mark your planting date and track the days. Most corms will sprout within 3-4 weeks if conditions are ideal, but don't be surprised if a few lag behind. The latecomers often catch up once the first shoots break through.
Deadheading Hack: That ½ inch above the base cut in Step 4 is more precise than it sounds. Use clean scissors or pruners to make the cut—this prevents disease better than snipping with fingers. I've found that deadheading every 2-3 days during peak bloom (usually late spring to early summer) extends the flowering season by 3-4 weeks compared to weekly deadheading.
Pro Tips for Ranunculus In Garden
- These simple strategies will help you avoid common mistakes and get the most vibrant blooms from your ranunculus.
- The Sunlight Secret: While ranunculus needs that full sun, I've learned the hard way that afternoon shade in hot climates makes all the difference.
- Soil Test Trick: That 30-minute drainage test in Step 1 is crucial—don't skip it!
Frequently asked questions
Got questions about growing ranunculus in your garden? You’re not alone! Here are some of the most common queries—plus quick, practical answers to help you cultivate these stunning blooms with confidence.
When is the best time to plant ranunculus?
Plant ranunculus bulbs in early fall (8–10 weeks before the first frost) for spring blooms. In warmer climates, you can plant in late winter (January–February). Avoid planting too early—they need a cooling period to thrive. For year-round color, stagger plantings every 4–6 weeks!
How often should I water ranunculus?
Keep soil consistently moist but not soggy—especially during bulb growth and flowering. Water 1–2 times per week (more in heatwaves) and reduce once blooms fade. Overwatering can cause rot, so ensure well-draining soil. Mulch lightly to retain moisture without suffocating the roots.
What pests or diseases commonly affect ranunculus?
Watch for slugs, snails, and aphids, which love young shoots. Botrytis blight (gray mold) can strike in damp conditions—space plants for airflow and avoid overhead watering. Preventative tip: Apply neem oil or diatomaceous earth early in the season. Remove damaged leaves promptly to stop spread.
Can I grow ranunculus in containers?
Use well-draining pots (at least 6 inches deep) with a mix of potting soil and perlite. Plant 3–5 bulbs per 10-inch container for a full look. Containers dry out faster, so check soil moisture daily. Bonus: Container ranunculus is perfect for patios, balconies, or even as cut flowers—they last 10+ days in vases!
What can I plant with ranunculus for a stunning combo?
Pair ranunculus with low-growing perennials like thyme, lavender, or creeping phlox for texture. Tall grasses (e.g., ornamental wheatgrass) or delphiniums add height contrast. Avoid bulb-heavy beds—ranunculus compete with other spring bloomers like tulips or daffodils for nutrients. Pro tip: Add foliage plants like heuchera to extend the season!
Wrapping up and next steps
Incorporating ranunculus into your garden is a fantastic way to add year-round beauty with minimal fuss—just follow the right steps! These vibrant blooms thrive with a little care, rewarding you with lush, long-lasting color that brightens any space.
Whether you’re a seasoned gardener or just starting out, their versatility makes them a must-have for any outdoor oasis. 🌸
Now that you’re armed with tips on planting, maintenance, and troubleshooting, take the plunge! Start small with a few bulbs or go bold with a full border—your garden (and future self) will thank you. Happy planting!
Next step: Grab your tools, pick your favorite ranunculus colors, and get growing—your garden’s next masterpiece is waiting! 🌱